

Copycat Little Debbie Christmas Tree Cakes
Did you know that during the holiday season, Little Debbie Christmas Tree Cakes are among the most requested snack, but do you that you don't have to wait for a store to carry them, you can make your own? Why settle for limited availability when you can create your own batch of these iconic treats right in your kitchen? This Copycat Little Debbie Christmas Tree Cakes recipe is your golden ticket to enjoying this festive favorite year-round. Forget the frantic store runs – let's dive into a simple, delicious way to satisfy that sweet craving whenever it strikes.
Ingredients List
Here's what you'll need to create these delightful Christmas Tree Cakes:
For the Cakes:
- 1 box (15.25 oz) yellow cake mix: Forms the foundation for our delicious trees. For a richer flavor, consider using a pound cake mix.
- 1 cup milk: Adds moisture and helps bind the cake ingredients. Almond milk also works well, if you're looking for a dairy-free option.
- ½ cup (1 stick) unsalted butter, melted: Provides richness and a tender crumb. Consider using brown butter for a rich nutty flavor but allow it to cool before mixing in.
- 3 large eggs: Bind the ingredients and contribute to the cake's structure.
- 1 teaspoon vanilla extract: Enhances the overall flavor profile. Bourbon vanilla extract will also gives a richer dimension.
For the Cream Filling:
- 1 cup (2 sticks) unsalted butter, softened: Forms the base of our creamy, dreamy filling.
- 3 cups powdered sugar: Provides sweetness and structure to the filling. Use a high-quality powdered sugar, sifting to remove any lumps.
- ¼ cup vegetable shortening: Adds stability and helps prevent the filling from melting too quickly.
- 2 tablespoons milk: Adjusts the consistency of the filling.
- 1 teaspoon vanilla extract: Enhances the flavor of the filling.
For the Coating & Decorations:
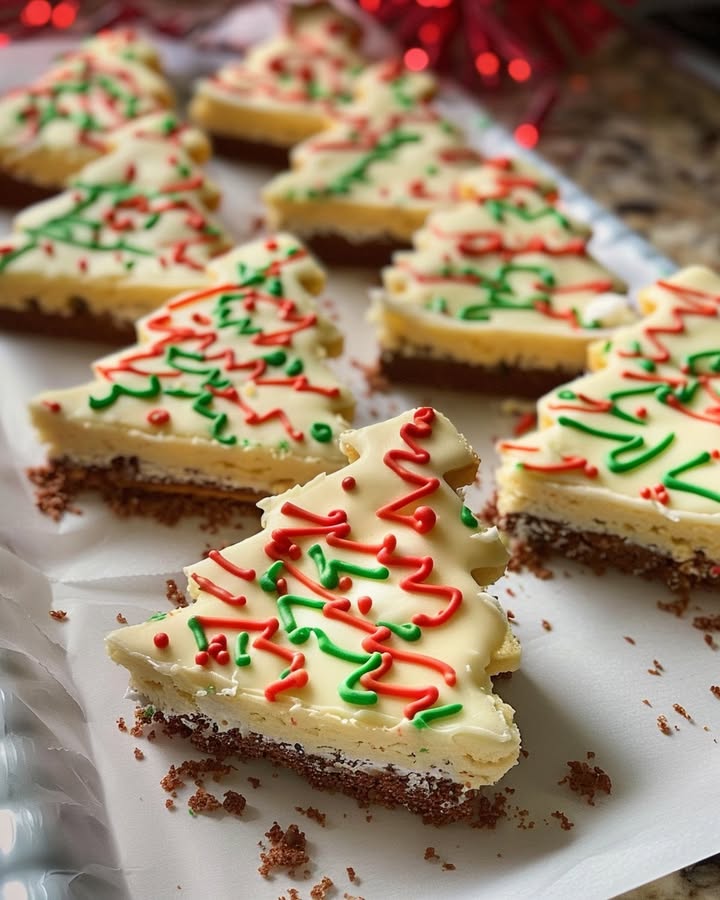
- 16 oz white chocolate chips: Melts into a smooth, luscious coating. Use a high-quality brand for best results.
- 2 tablespoons vegetable shortening: Helps thin the white chocolate for easier dipping.
- Green food coloring: For that iconic Christmas tree hue. Gel food coloring creates a vibrant color.
- Red sugar sprinkles: Because those sweet, festive details are key!
Timing
Here's an estimate of the time you'll need:
- Prep Time: 30 minutes
- Bake Time: 18-22 minutes
- Cooling Time: 1 hour
- Assembly & Decoration: 45 minutes
- Total Time: Roughly 2 hour and 45 minutes, this is significantly less time than you might spent chasing these snacks in the stores which can take hours to gas costs and time, saving you time and money.
Step-by-Step Instructions
Step 1: Preheat and Prepare
Preheat your oven to 350°F (175°C). Grease and flour a 9×13 inch baking pan to prevent sticking. Or consider using parchment paper as it provides the cleanest release.
Actionable Tip: For an even cleaner release, line the pan with parchment paper and then grease the parchment paper.
Step 2: Mix the Cake Batter
In a large bowl, combine the yellow cake mix, milk, melted butter, eggs, and vanilla extract. Beat with an electric mixer until well combined. The batter should be smooth and consistent.
Personalization: If you prefer a denser cake like the original snack cake, gently stir the ingredients until just combined. Overmixing results in a lighter, airier cake.
Step 3: Bake the Cake
Pour the batter into the prepared pan and spread evenly. Bake for 18-22 minutes, or until a toothpick inserted into the center comes out clean.
Data Insight: Average cake baking times vary, but a clean toothpick is always the most reliable indicator of doneness.
Step 4: Cool Completely
Let the cake cool in the pan for 10 minutes before transferring it to a wire rack to cool completely. Cooling completely is crucial for the cake to maintain its shape when cutting.
Trick: Place in the freezer for 15 minutes before cutting into the trees to help them stay together when removing.
Step 5: Make the Cream Filling
In a large bowl, beat the softened butter and vegetable shortening with an electric mixer until light and fluffy. Gradually add the powdered sugar, one cup at a time, beating well after each addition. Add the milk and vanilla extract, and beat until smooth and creamy.
Actionable Tip: Ensure both butter and shortening are softened to room temperature for the smoothest frosting.
Step 6: Cut Out Christmas Trees
Once the cake has fully cooled, use a Christmas tree-shaped cookie cutter to cut out as many trees as possible.
Personalization: Have custom cookie cutters? If it’s not the holiday season use any shape you want, hearts, stars, and etc.
Step 7: Assemble the Cakes
Carefully slice each tree in half horizontally. Spread a generous amount of cream filling on the bottom half of each tree, and then carefully place the top half back on. If easier you can layer the filling on the whole sheet cake, then cut out pieces.
Tip: Avoid compressing, you don’t want flat trees.
Step 8: Melt the White Chocolate
In a microwave-safe bowl, melt the white chocolate chips and vegetable shortening in 30-second intervals, stirring in between, until smooth. Add green food coloring and stir until you reach your desired shade of green.
Actionable Tip: Use a double boiler for even melting that prevents burning.
Step 9: Dip and Decorate
Dip each assembled cake into the melted green chocolate, ensuring it’s fully coated. Place on a parchment-lined baking sheet. Before the chocolate sets, sprinkle with red sprinkles.
Trick: Use a fork to gently lift and tap the dipped cake to remove excess melted chocolate.
Step 10: Chill
Place the decorated Christmas tree cakes in the refrigerator to set for at least 30 minutes.
Actionable Advice: Chilling helps the chocolate coating to firm up, making them easier to handle and enjoy!
Nutritional Information
Per serving (approximate):
- Calories: 350-400
- Fat: 20-25g
- Saturated Fat: 12-15g
- Cholesterol: 50-60mg
- Sodium: 150-200mg
- Carbohydrates: 40-45g
- Sugar: 30-35g
- Protein: 3-4g
Data Insights: Adjustments to servings and ingredients can significantly impact these values.
Healthier Alternatives for the Recipe
- Cake: Use whole wheat pastry flour in place of some of the cake mix for added fiber. Reduce the amount of butter or substitute with unsweetened applesauce.
- Filling: Substitute half of the butter with Greek yogurt for a lower-fat alternative. Reduce the amount of powdered sugar or use a natural sweetener like stevia.
- Coating: Use dark chocolate instead of white chocolate for added antioxidants and a lower sugar content.
- Dietary Needs: For gluten-free Christmas Tree Cakes, use a good-quality gluten-free cake mix. For dairy-free, substitute almond milk for regular milk and use dairy-free butter and chocolate.
Serving Suggestions
- Serve with a glass of cold milk for a classic pairing.
- Add a scoop of vanilla ice cream for an extra indulgent treat.
- Arrange the Copycat Little Debbie Christmas Tree Cakes on a festive platter for holiday gatherings.
- Cut up and use them on an ice cream Sunday or brownie.
Personalized Tip: Consider serving with warm apple cider or hot cocoa during the colder months to enhance the cozy, festive experience.
Common Mistakes to Avoid
- Overbaking: Overbaking can result in a dry cake. Remove from oven as soon as a toothpick inserted in the center comes out clean.
- Melting the Chocolate Incorrectly: Ensure the chocolate doesn’t burn by heating in short intervals and stirring well.
- Inconsistent Tree Size: When cutting out the trees, aim for uniformity in size to achieve a consistent look.
- Warm Filling: Avoid adding when cake is warm, the filling will melt.
Data Insight: Monitoring oven temperature with an oven thermometer can help prevent overbaking.
Storing Tips for the Recipe
- Cake: Store unfrosted cake layers in an airtight container at room temperature for up to 3 days or in the freezer for up to 2 months.
- Filling: Store the cream filling in an airtight container in the refrigerator for up to 5 days.
- Assembled Cakes: Store the fully assembled and decorated cakes in the refrigerator for up to a week.
Emphasis: Always store assembled cakes in a single layer to prevent the sprinkles from smudging.
Conclusion
Creating Copycat Little Debbie Christmas Tree Cakes at home is easier than you thought. Imagine the joy of biting into this festive tradition. Ready to make this recipe your own? Share your creations with us and discover even more recipes to amplify the holiday spirit! What are you waiting for? Get baking!
FAQs
Q: Can I use a different cake mix?
A: Absolutely! While yellow cake mix gives the most authentic Little Debbie flavor, feel free to experiment with vanilla, chocolate, or even spice cake mix. Be aware this may impact the flavor a little.
Q: Can I freeze the completed Christmas Tree Cakes?
A: Yes, you can! Wrap each cake individually in plastic wrap, then place them in a freezer-safe container. They can be stored in the freezer for up to a month. Before serving, allow them to thaw in the refrigerator for a few hours.
Q: What’s the best way to cut the Christmas tree shapes?
A: A sharp cookie cutter with a thin edge works best. Dipping the cutter in powdered sugar between cuts can also help prevent sticking.
Q: Can I use different colored sprinkles?
A: Of course! While red sprinkles are traditional, feel free to use any combination of colors you like to customize your cakes to your liking. Consider silver and gold for an elegant touch.
Q: What if my chocolate is too thick to dip the cakes?
A: Add a little more vegetable shortening, a teaspoon at a time, until you reach the desired consistency. Be careful not to add too much, as the chocolate may not set properly.
Copycat Little Debbie Christmas Tree Cakes
Description
A homemade version of the beloved holiday snack cake, featuring soft vanilla cake layers, a creamy filling, and a festive chocolate coating with colorful sprinkles.
Ingredients
For the Crust:
- 1 box vanilla cake mix (plus ingredients listed on box)
- 1/2 cup unsalted butter, softened
- 2 cups powdered sugar
- 1 tsp vanilla extract
- 2–3 tbsp milk
- 12 oz green candy melts
- 1 tbsp coconut oil
- Assorted holiday sprinkles
Instructions
1. Prepare the Crust:
- Prepare the vanilla cake mix according to package directions. Bake in a greased 9×13 inch pan as directed. Let the cake cool completely.
- For the filling, beat the softened butter, powdered sugar, and vanilla extract together. Add milk one tablespoon at a time until a smooth, spreadable consistency is achieved.
- Cut the cooled cake into Christmas tree shapes using a tree-shaped cookie cutter. Carefully slice each tree horizontally to create a top and bottom half.
- Spread a layer of the buttercream filling on the bottom half of each tree and place the top half on to create a cake sandwich.
- Melt the green candy melts with the coconut oil in 30-second intervals in the microwave, stirring until smooth. Carefully dip each assembled tree cake into the chocolate, allowing excess to drip off. Immediately decorate with sprinkles and place on a parchment-lined baking sheet to set completely.
Notes
You can customize the seasonings to taste.


