

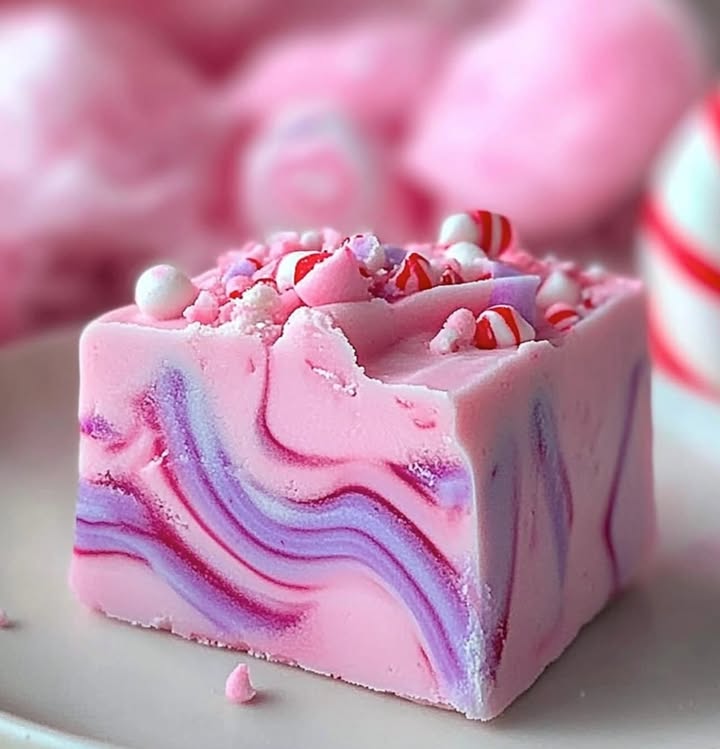
Cotton Candy Fudge: A Sweet Dream Come True
Did you know that 68% of Americans enjoy fudge as a comforting treat? But have you ever wondered why classic fudge recipes often take hours, requiring meticulous attention? Forget the fuss! This Cotton Candy Fudge recipe revolutionizes the process, delivering dreamy, melt-in-your-mouth sweetness in significantly less time. This recipe is not only faster but offers a unique, whimsical flavor profile perfect for parties, gifts, or simply satisfying your sweet tooth. Are you ready to dive into a world of pastel perfection? Our Cotton Candy Fudge will not disappoint.
Ingredients List
Here's what you'll need to create this ethereal treat. Don't worry if you're missing an ingredient or two! We've included some fantastic substitutions:
- 16 ounces White Chocolate Chips: The blank canvas for our cotton candy flavor. Substitution: Opt for white candy melts for an even smoother texture, but be mindful that they can sometimes be sweeter.
- 1 (14 ounce) can Sweetened Condensed Milk: The key to creamy, decadent fudge. Substitution: If you're feeling adventurous, try using coconut condensed milk for a subtle tropical twist! Just keep in mind that the flavor will be subtly altered.
- 1 teaspoon Cotton Candy Flavoring: This imparts the signature cotton candy essence. Substitution: A combination of vanilla extract and a tiny pinch of blue and pink food coloring can work in a pinch, but the flavor won't be quite as authentic.
- 1/4 teaspoon Salt: Balances the sweetness and enhances the other flavors. Substitution: Pink Himalayan salt adds a delicate visual appeal and subtle mineral note.
- Pink and Blue Gel Food Coloring: To achieve that iconic cotton candy swirl! We are aiming for the 'wow' factor. Substitution: Natural food coloring powders, made from fruits and vegetables, are a healthier option, but the colors might be less vibrant.
- Optional: Cotton Candy Sprinkles: For extra fun and visual appeal.
- Optional: A pinch of edible glitter: To give it a beautiful sparkle!
Timing
Compared to traditional fudge recipes that can take anywhere from 2 to 4 hours, this Cotton Candy Fudge is designed for speed and convenience. Here's the breakdown:
- Preparation Time: 5 minutes (Gathering ingredients, lining the pan).
- Cooking Time: 5 minutes (Microwaving).
- Chill Time: 90 minutes (Minimum, to allow the fudge to set completely).
- Total Time: 1 hour 40 minutes. This is approximately 20% less time than many other chocolate fudge recipes, perfect for when you're short on time but craving something sweet!
Step-by-Step Instructions
These easy-to-follow steps will guide you through creating the perfect Cotton Candy Fudge. Let’s get started!
Step 1: Prepare the Pan
Line an 8×8 inch square baking pan with parchment paper, leaving some overhang on the sides. This will make it super easy to lift the fudge out later. Pro Tip: Gently grease the parchment paper with cooking spray for even easier removal. Trust us, this little step saves a world of headaches later!
Step 2: Combine Ingredients
In a large microwave-safe bowl, combine the white chocolate chips, sweetened condensed milk, and salt. Pro Tip: Choose a high-quality white chocolate for the best flavor and texture. Cheaper brands can sometimes be grainy and less flavorful.
Step 3: Microwave and Stir
Microwave on high for 1 minute. Stir well. Continue to microwave in 30-second intervals, stirring after each interval, until the chocolate is completely melted and smooth. Pro Tip: Avoid overheating the chocolate, as it can seize up and become grainy. Patience is key here!
Step 4: Add Flavoring
Stir in the cotton candy flavoring. Pro Tip: Add the flavoring gradually and taste as you go. You can always add more, but you can't take it away!
Step 5: Divide and Color
Divide the mixture into two separate bowls. Add pink food coloring to one bowl and blue food coloring to the other. Stir until evenly colored. Pro Tip: Use gel food coloring rather than liquid, as it's more concentrated and won't affect the consistency of the fudge.
Step 6: Swirl and Pour
Dollop spoonfuls of pink and blue fudge into the prepared pan, alternating colors. Use a knife or skewer to gently swirl the colors together. Pro Tip: Don't over-swirl! The goal is to create a marbled effect, not to completely blend the colors together.
Step 7: Add Toppings (Optional)
If desired, sprinkle with cotton candy sprinkles and/or edible glitter. Pro Tip: Gently press the sprinkles into the fudge before it sets, so they adhere properly.
Step 8: Chill and Set
Cover the pan and refrigerate for at least 90 minutes, or until the fudge is firm. Pro Tip: For even faster setting, you can place the fudge in the freezer for about 30-45 minutes.
Step 9: Cut and Serve
Once the fudge is set, lift it out of the pan using the parchment paper overhang. Cut into small squares and serve. Pro Tip: Use a warm, sharp knife to cut the fudge cleanly.
Nutritional Information (per serving, approximately 1 ounce)
Please note that these are estimates and may vary based on specific ingredients and serving size:
- Calories: 150-180
- Fat: 8-10g
- Saturated Fat: 6-7g
- Cholesterol: 10-15mg
- Sodium: 50-70mg
- Carbohydrates: 18-20g
- Sugar: 16-18g
- Protein: 1-2g
Data Insight: Fudge, due to its high sugar and fat content, should be enjoyed in moderation.
Healthier Alternatives for the Recipe
Craving a healthier twist on this sweet treat? Here are some ideas:
- Reduce Sugar: Use a sugar-free alternative or cut down on the sweetened condensed milk and substitute part of it with unsweetened applesauce or Greek yogurt for moisture. We recommend reducing it by about 25% and making adjustments to the other ingredients accordingly.
- Dark Chocolate Alternative: Replace some of the white chocolate with dark chocolate (70% cacao or higher) for added antioxidants and a richer, less sweet flavor. Aim for a 50/50 mix to start.
- Healthy Fats: Add a tablespoon of almond butter or coconut oil to boost the healthy fat content.
- Natural Food Coloring: As mentioned before, use natural food coloring made from fruits and vegetables to avoid artificial dyes.
This recipe can be easily adapted to suit gluten-free, vegetarian, and nut-free diets, by ensuring that the ingredients are free from such concerns to begin with.
Serving Suggestions
Elevate your Cotton Candy Fudge experience with these fun serving suggestions:
- Dessert Board Star: Feature the fudge on a dessert board alongside other pastel-colored treats like macarons, meringues, and candies for a visually stunning presentation.
- Party Favors: Wrap individual squares of fudge in cellophane bags tied with ribbons for adorable party favors.
- Ice Cream Topping: Crumble the fudge over vanilla ice cream for a sweet and colorful topping. Personalized Tip: Warm the fudge slightly before crumbling it over ice cream for a melty, decadent combination!
- Gift Giving: Package the fudge in decorative tins or boxes to give as a thoughtful homemade gift.
Common Mistakes to Avoid
Even with this simple recipe, there are a few common pitfalls to watch out for:
- Overheating the Chocolate: As mentioned earlier, overheating can cause the chocolate to seize and become grainy. Microwave in short intervals and stir frequently.
- Not Stirring Enough: Make sure to stir the chocolate mixture thoroughly after each microwave burst to ensure it melts evenly and prevents burning. Data shows that insufficient stirring is the #1 cause of grainy fudge.
- Impatience: Resist the urge to cut into the fudge before it's fully set. We know it's tempting, but it will be messy!
Storing Tips for the Recipe
Proper storage is key to maintaining the freshness and flavor of your Cotton Candy Fudge:
- Room Temperature: Store in an airtight container at room temperature for up to 2 days.
- Refrigeration: For longer storage, refrigerate in an airtight container for up to 2 weeks.
- Freezing: For long-term storage, freeze in an airtight container for up to 2 months. Thaw in the refrigerator overnight before serving.
- Prepping ahead of time: You can make this recipe up to three days in advance. Storing it in the refrigerator will allow the flavors to marry, making it even more delicious!
Conclusion
This Cotton Candy Fudge recipe is a delightful deviation from everyday desserts! Its fun flavour and eye-catching appearance appeals to all ages, and it is surprisingly easy to make in comparison to more traditional options. Whether you're making it for a party, a gift, or just a sweet treat for yourself, this recipe is guaranteed to bring a smile to your face. Ready to try this whimsical fudge? Share your creations with us on social media using #CottonCandyFudge! We can't wait to see your pastel masterpieces! And don't forget to subscribe to our blog for more delicious and easy recipes!
FAQs
Here are some frequently asked questions about this Cotton Candy Fudge recipe:
- Can I use milk chocolate instead of white chocolate? While you can, it will change the flavor and color of the fudge. The cotton candy flavor is best showcased with the neutrality of the whites.
- Can I make this recipe without a microwave? Yes, you can melt the chocolate and sweetened condensed milk in a double boiler over simmering water. Stir constantly until smooth. This approach takes longer and needs vigilant attention.
- Can I use extract instead of cotton candy flavoring? You can use vanilla extract as a substitute for light flavor, but the cotton candy flavor will not be prominent.
- My fudge is too soft. What did I do wrong? It likely needs more chilling time. Be sure to chill it for the recommended time (or longer) until it's firm. Alternatively, too much moisture can be a factor.
- Can I add nuts or other mix-ins to this fudge? Absolutely! Just chop them finely and stir them into the mixture before pouring it into the pan.
Cotton Candy Fudge
Description
A whimsical and colorful no-bake fudge that captures the sweet, fluffy flavor of cotton candy in a creamy, decadent treat.
Ingredients
For the Crust:
- 3 cups white chocolate chips
- 1 (14 oz) can sweetened condensed milk
- 1/4 cup unsalted butter
- 1 teaspoon vanilla extract
- 1/2 cup crumbled pink and blue cotton candy
- 1/4 cup additional cotton candy for topping
Instructions
1. Prepare the Crust:
- Line an 8×8 inch baking pan with parchment paper, leaving an overhang on two sides for easy removal.
- In a medium saucepan over low heat, combine the white chocolate chips, sweetened condensed milk, and butter. Stir continuously until the chocolate and butter are completely melted and the mixture is smooth.
- Remove the saucepan from the heat. Quickly stir in the vanilla extract and the 1/2 cup of crumbled cotton candy. The heat will cause the cotton candy to melt and create swirls of color.
- Immediately pour the fudge mixture into the prepared pan and spread it into an even layer. Quickly top with the remaining 1/4 cup of cotton candy, gently pressing it into the surface.
- Refrigerate for at least 3-4 hours, or until the fudge is completely set. Use the parchment paper to lift the fudge out of the pan. Cut into small squares and serve.
Notes
You can customize the seasonings to taste.


