Homemade Bread: A Deliciously Simple Guide to Baking the Perfect Loaf
The aroma of freshly baked homemade bread has the uncanny ability to turn any house into a home. With its warm, comforting scent wafting through the air, it evokes memories of simpler times and delightful family gatherings. Crafting your own loaf is not only a rewarding culinary experience but also an opportunity to tailor your bread to suit your tastes perfectly. Whether you’re a seasoned baker or a curious newbie, this simple yet satisfying homemade bread recipe promises a delectable outcome that will leave you craving more.
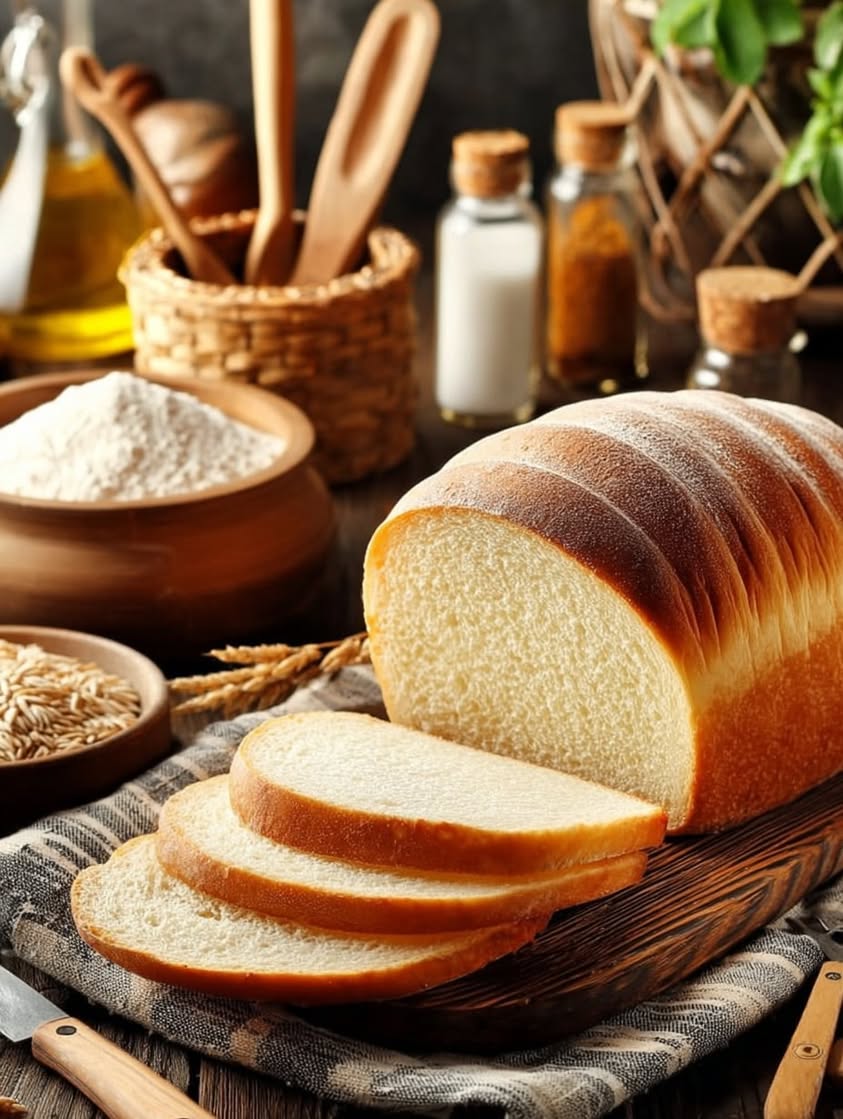
This bread is beautifully balanced, baked to a golden-brown perfection with a crusty exterior and a soft, fluffy interior. It pairs perfectly with your favorite toppings, from creamy butter to luscious jam, making it an irresistible accompaniment to any meal. The process, though slightly time-consuming, involves straightforward steps that guide you through creating a loaf that both nourishes the soul and tantalizes the taste buds.
Experience the joy of kneading, the anticipation of rising dough, and the delight of pulling a steaming, golden loaf from the oven. This homemade bread is rich in flavor, surprisingly easy to make, and sure to become a household favorite. By using staple ingredients and little else, you are assured of a wholesome and hearty product that champions both flavor and nutrition.
Quick Recipe Highlights
- Flavor Profile: A harmonious blend of natural yeastiness and subtle sweetness that elevates the experience of each bite.
- Texture: Enjoy the contrast between a crispy crust on the outside and a soft, moist crumb within, offering a satisfying chew.
- Aroma: Captivating notes of warm, nutty wheat, accompanied by the mellow indulgence of fermentation.
- Visual Appeal: A beautiful, golden-brown exterior with a rustic, artisan look that makes it a centerpiece at any meal.
- Skill Level Needed: Some familiarity with basic yeast and dough techniques is beneficial, though detailed instructions can guide novices.
- Special Equipment: A mixing bowl, loaf pan, and a reliable oven thermometer for optimal results.
Recipe Overview
- Difficulty Level: Moderately easy, ideal for those who are comfortable with basic baking techniques and eager to explore more.
- Category: Best categorized under bread, this recipe suits any meal—be it breakfast, brunch, or a comforting dinner.
- Cuisine: Rooted in Western culinary traditions, the recipe nods to European bread-making customs while welcoming diverse modifications.
- Cost: Budget-friendly, with the main ingredients—flour, yeast, and water—being economical and easily accessible to most pantries.
- Season: Although delightful year-round, freshly baked bread is particularly comforting during cooler months when warmth is cherished.
- Occasion: Perfect for everyday meals, festive gatherings, and cozy family dinners, it enhances numerous social and culinary events.
Why You’ll Love This Recipe
Imagine tearing into a slice of homemade bread, its crisp crust yielding to a soft, delicate crumb beneath. The texture of this homemade bread is its hallmark, offering a delectable bite that marries perfectly with sweet or savory accompaniments. Its taste is a masterclass in simplicity—a subtle blend of fermentation-derived flavors accented by the warm nuttiness of wheat, bringing back the essence of genuine, hearty bread.
One of the chief joys of this homemade bread is its convenience. Despite seeming daunting at first glance, the actual process is straightforward and can adapt to fit into your schedule. The dough requires minimal attention once mixed, allowing you to go about your day while nature works its magic in rising times.
Nutritionally, this homemade bread shines by maintaining essential minerals and vitamins often lost in commercial alternatives. It’s a wonderful way to consume grains in their purest form, offering dietary fiber that’s crucial for digestive health. Plus, you have the freedom to control additives, ensuring a wholesome product.
Baking your own bread is a perfect social activity. Include family or friends in the process, turning it into a fun and educational experience. Serve it warm at gatherings, and watch as people gravitate towards the inviting aroma and appealing texture. It’s a crowd-pleaser, eliciting admiration and requests for the recipe.
Not only is this homemade bread a pleasure to make and consume, but it’s also cost-effective. Using staple ingredients that are inexpensive and readily available makes it an accessible venture. Homemade bread can serve as a staple, outshining store-bought options while being kinder on the wallet.
Historical Background and Cultural Significance
The history of bread is as old as agriculture itself. Dating back to the ancient Egyptians over 15,000 years ago, the humble loaf has traversed cultures and continents, evolving into countless regional varieties. This homemade bread recipe, reflecting a more Western approach, builds on centuries of bread-making wisdom. In early societies, bread was not merely food but also a form of currency and a religious symbol.
Bread has been integral to many cultures, serving as a staple food and a medium of communal sharing. Its significance is evident in numerous cultural rituals and ceremonies, often symbolizing sustenance and life. The act of breaking bread is synonymous with fellowship and community, imbuing each loaf with more than just physical sustenance.
Through history, the recipe for homemade bread has seen various adaptations, influenced by the ingredients available, prevailing tastes, and technological advancements. The introduction of refined flour during the industrial revolution marked a significant change, leading to the modern variations we see today, each with its own stories and traditions.
Regional variations are vast and diverse—the French baguette, Italian ciabatta, and German pumpernickel among them—each offering distinct flavors and textures reflective of local tastes and baking expertise. These adaptations speak to bread’s adaptability, showing its capacity to evolve while remaining a fundamental dietary component worldwide.
Ingredient Deep Dive
Flour is the foundation of homemade bread, its protein content determining the rise and structure of the loaf. Historically, different grains have been used across cultures, from wheat and rye in Europe to corn in the Americas. The choice of flour impacts flavor and texture, with whole grains offering a more nutritious option laden with fiber and protein. For storage, keep flour in a cool, dry place to prevent spoilage, and consider refrigeration for longer shelf life. Experiment with types for diverse flavors, or opt for gluten-free blends for dietary needs.
Yeast plays the pivotal role of leavening, transforming dough into bread through fermentation. This microorganism has been harnessed for centuries, from naturally occurring wild yeasts to modern cultivated strains. Yeast contributes not only to rise but also imparts subtle flavors and aromas to the bread. Store it in a cool, dry place as well, and use within its expiration date for the best results. For alternatives, sourdough starters offer a flavorful and natural leavening option.
Common Mistakes to Avoid
- Over-Kneading: While kneading is essential for gluten development, doing so excessively can lead to a tough crumb. Trust the texture and appearance of the dough as your guide.
- Incorrect Flour Measurements: Always measure flour accurately using the scoop and level method to ensure the correct dough consistency.
- Inadequate Rise Time: Rushing the rising process produces dense bread. Patience is key; the dough should double in size for optimal results.
- Improper Oven Temperature: Baking at the wrong temperature affects texture and crust formation. Preheat your oven and use an oven thermometer for accuracy.
- Skipping the Score: Scoring the bread allows it to expand during baking, preventing unsightly cracks. Do not overlook this final step for both aesthetics and structure.
- Using Expired Yeast: Ensure your yeast is fresh and active by proofing it before incorporating it into the dough.
- Ignoring Salt: Salt enhances flavor and controls yeast activity. Forgetting it results in bland bread.
- Incorrect Shaping: Take time to shape the bread well to ensure even baking and an aesthetically pleasing loaf.
- Storing Improperly: Cool the bread completely before storing to prevent moisture retention and mold.
- Underbaking: Ensure your bread is fully baked by checking for a hollow sound when tapped and a golden-brown crust.
Essential Techniques
Kneading is key to structure in homemade bread, promoting gluten development, which captures air bubbles, contributing to the bread’s texture. Mastering kneading involves a rhythmic, folding and pressing motion, which can be achieved by hand or with a stand mixer. Watch for a cohesive, elastic dough as your visual signal of success. Avoid adding too much flour during this process, which can overwork the dough.
Proofing, the process where dough rises, is crucial for fermentation, ensuring a light and airy loaf. Understanding this timing is essential—under-proofed dough will yield dense results, and over-proofing causes collapse during baking. Ideal proofing showcases dough that has doubled and retains a slight indentation when gently pressed.
Pro Tips for Perfect Homemade Bread
Utilize the windowpane test to determine when your dough has been kneaded enough. Stretch a piece of dough gently between your fingers; it should form a thin, translucent membrane without tearing.
For an exceptionally crisp crust, introduce steam during baking by placing a shallow pan of water in the oven to create humidity. This moisture enhances crust formation as it bakes.
Remember, fresh yeast is preferable for beginners due to its predictability and consistent rising results, making it ideal for learning the nuances of bread-making.
Invest in a high-quality loaf pan to ensure even baking and a professional shape to your homemade bread, facilitating a balanced rise and consistent crumb.
Consider preheating your loaf pan before use; this can help promote an initial burst of heat to encourage higher rising in the oven.
For increased flavor complexity, experiment with adding herbs or aromatics to the dough, such as rosemary or roasted garlic, providing an additional depth of flavor to the finished loaf.
Don’t be afraid to adjust hydration levels slightly based on humidity and flour type. A wetter dough might require slightly more flour, while a drier climate could benefit from extra moisture.
Allow the freshly baked bread to cool completely on a wire rack before slicing to prevent a gummy texture and to set the crumb structure.
Variations and Adaptations
Regional variations such as adding olives or sun-dried tomatoes to the dough echo Mediterranean influences, while the inclusion of whole grains nods to Scandinavian preferences. Seasonal adaptations think of pumpkin seeds in the autumn or zest and dried fruits for a festive winter twist, tailoring the bread to complement the times.
For dietary modifications, experimenting with gluten-free baking mixes can be a perfect option, often requiring slight adjustments to liquid ratios. Use lactose-free milk or its plant-based counterparts for a dairy-sensitive approach, keeping the bread just as delicious.
Experiment with flavor variations by adding spices like cinnamon or nutmeg for a warming aroma, or integrate flaxseeds and nuts for a hearty, nutritious dimension, providing texture modifications that cater to personal preference.
For presentation alternatives, consider shaping into artisan boules or baguettes for a rustic visual appeal, or bake in smaller loaves to gift as thoughtful, handmade presents.
Serving and Presentation Guide
To present your homemade bread elegantly, slice it thickly and create a rustic stack, accentuating its texture. Garnish with a herb sprig or olive tapenade for an extra pop of color and flavor. Traditionally, bread is served warm with butter; consider modern serving suggestions like a bruschetta-style appetizer or as a base for a gourmet sandwich.
Temperature considerations are key—serve slightly warmed to amplify its aroma without compromising the crust’s integrity. For portion control, pre-slice before serving to ensure even distribution among guests and avoid waste.
Wine and Beverage Pairing
Consider pairing homemade bread with a light, crisp white wine to complement its yeastiness, or a dry, sparkling variety for a festive occasion. Non-alcoholic alternatives could include a refreshing herbal tea infused with citrus to match the bread’s subtle notes.
Coffee or tea pairings enhance the homemade bread experience—a strong espresso contrasts beautifully, while a delicate white tea complements its nuanced flavors. Consider temperature when serving and storage to maintain the beverage’s characteristic essence.
Storage and Shelf Life
To extend shelf life, store homemade bread at room temperature in a breathable cloth or paper bag to maintain crust texture, avoiding plastic to prevent moisture retention and mold. Refrigeration is not recommended as it accelerates staling.
Signs of spoilage include off smells or visible mold—at this point, discard to avoid consuming contaminated bread. To reheat, gently warm slices in an oven to refresh the crust and internal crumb without drying out.
Freezing is ideal for long-term storage, ensuring slices are separated by parchment paper to allow pulling only what you need. Thaw slowly at room temperature for the best texture results, and consider a quick oven refresh to restore crispness.
Make Ahead Strategies
Consider preparing dough ahead of a busy day, allowing it to rise in the refrigerator overnight for a deeper flavor and flexibility in baking time. Between steps, ensure the dough is covered with cling wrap to protect it from drying out or crusting over.
Assess quality impact—cold rising maintains flavor integrity, though slightly different in texture. Fresh element additions, such as herbs, are best integrated into the dough versus added as toppings, barring post-bake oils or butters.
Scaling Instructions
Halve the recipe by adjusting ingredient quantities proportionately, taking care to adjust the pan size accordingly, ensuring the dough is not too thin to rise effectively. Doubling or tripling requires larger mixing bowls and potentially longer baking times to ensure full cooking through the center.
Consider storage space for larger quantities before scaling. Adjustments to equipment like a larger loaf pan or additional oven time should account for even heat distribution, crucial for consistent results.
Nutritional Deep Dive
Bread offers a healthy dose of carbohydrates, the body’s primary energy source, complemented by fiber in whole grain options, crucial for digestive health. Consider micronutrient analysis—whole grain inclusion increases intake of B vitamins, enhancing neurological function and energy metabolism.
Homemade bread contributes to a balanced diet when portions are monitored, offering complex carbohydrates without preservatives. Its nutritional profile supports dietary considerations, maintaining control over ingredients and potential allergens.
Dietary Adaptations
For gluten-free adaptations, utilize a certified gluten-free flour mix, adjusting hydration and baking time as necessary to avoid density issues. Dairy-free versions might substitute plant-based milk options, ensuring the bread remains soft and creamy.
Vegan adaptations avoid eggs or dairy, leveraging olive oil or non-dairy substitutes to maintain moisture. Low-carb versions may include alternative flours, like almond or coconut, to maintain flavor while reducing carbs.
Keto and Paleo diets incorporate high-fat alternatives and emphasize reducing carbohydrate content, keeping focus on protein-rich flours for structure. Ingredients like almond flour can mimic traditional textures while fulfilling dietary constraints.
Observing Low-FODMAP guidelines might involve substituting yeast and traditional wheat, opting for fresh herbs or spices to offset flavors naturally occurring in other ingredients for digestibility.
Troubleshooting Guide
For texture issues, such as overly dense bread, ensure proper kneading and check yeast viability. Address flavor balance by adjusting salt, easily omitted but vital to bring out the dough’s natural flavors.
Temperature problems occur with an inconsistent oven, underbaking producing a doughy loaf—use an oven thermometer to ensure stable internal temperatures for reliable cooking. Equipment challenges arise when mixing tools or ovens fail, requiring substitution or strategic timing adjustments.
Ingredient substitutions should prioritize maintaining integrity—consider similar compositions for best results. Timing concerns largely pertain to fermentation times, as over-proofing could result in uneaten gas escaping and collapsing the loaf before baking.
Recipe Success Stories
Community feedback reveals imaginative adaptation stories, like adding nuts and seeds to the mix for enriched texture. Variations such as incorporating local grains or cultural spices foster a recipe’s regional connection, contributing valuable insight to aspiring bakers.
Adaptation stories illustrate resourceful substitutes like applesauce or aquafaba in place of eggs, showcasing successful dietary modifications leveraged by readers. Photography tips animate the bread’s myriad variations for presentation, as readers encourage artistic arrangements alongside supportive tips providing the desired aesthetic.
Frequently Asked Questions
Q: Can I use any flour for homemade bread?
A: While bread flour is recommended for its high gluten content, all-purpose flour can also be used. Be mindful that texture and rise may vary slightly; whole wheat and gluten-free flours are excellent alternatives.
Q: How can I tell if my dough has risen enough?
A: Properly risen dough should roughly double its original volume. It should feel airy and light with a slight indentation sustained when pressed gently with your fingertip.
Q: Why does my homemade bread crust get hard?
A: Typically, a hard crust results from over-baking or insufficient moisture. Introduce steam during baking to facilitate crust formation or reduce bake time slightly during subsequent tries.
Q: How long should I knead dough if I’m doing it by hand?
A: Kneading dough by hand should take about 10-12 minutes. It’s crucial to watch for a smooth, elastic texture that passes the windowpane test.
Q: Can I omit salt from my homemade bread recipe?
A: Omitting salt is possible but not recommended—it plays a role in flavor enhancement and slows yeast fermentation, impacting the bread’s final texture.
Q: Is tap water suitable for making bread dough?
A: Yes, tap water is generally suitable, though it’s wise to check if your water is heavily chlorinated, which can impact yeast activity. If so, filtered water could be a better option.
Q: How can I prevent homemade bread from going stale quickly?
A: Correct storage is key; hold it in a cool, dry place within a cloth or paper bag. Avoid refrigeration since it accelerates staling; consider freezing for prolonged storage.
Q: What’s the best way to achieve a glossy crust?
A: Brushing your dough with an egg wash before baking helps achieve a glossy, golden crust. Milk can serve as an acceptable vegan equivalent for similar results.
Q: Why did my bread not rise much during baking?
A: Several factors can inhibit oven-spring growth, such as an under-proofed dough or too low an oven temperature. Correct these aspects on subsequent attempts for optimal rise.
Q: Are bread-making machines effective for this recipe?
A: While a bread machine can be convenient, this recipe benefits from the hands-on approach where textures and flavors are enhanced through personalized kneading and rising times.
Additional Resources
Explore related recipes like whole wheat or sourdough variations to deepen your bread-making repertoire. Technique guides offer detailed instructions for mastering elements like scoring and fermenting. Ingredient information covers nutritional benefits and diverse applications.
Equipment recommendations provide insight into the best tools for efficient baking. Discover seasonal variations to align bread-making activities with available ingredients, enhancing both the enjoyment and flavor profile of homemade bread.
Print
Homemade Bread
Description
A simple and delicious homemade bread that’s perfect for sandwiches or as a side.
Ingredients
For the Crust:
- 4 cups all-purpose flour
- 2 teaspoons salt
- 1 tablespoon sugar
- 1 packet (2 1/4 teaspoons) active dry yeast
- 1 1/2 cups warm water (110°F/45°C)
- 2 tablespoons olive oil
Instructions
1. Prepare the Crust:
- In a large bowl, combine flour, salt, and sugar.
- Dissolve yeast in warm water and let sit for 5 minutes until foamy.
- Add yeast mixture and olive oil to the dry ingredients. Mix until a soft dough forms. Knead on a floured surface for about 10 minutes until smooth and elastic.
- Place dough in a lightly oiled bowl, cover with a damp cloth, and let rise in a warm area for 1 hour or until doubled in size.
- Punch down the dough, shape it into a loaf, and place it in a greased loaf pan. Cover and let rise again for 30 minutes.
- Preheat oven to 375°F (190°C). Bake the bread for 25-30 minutes, or until golden brown and hollow when tapped. Allow to cool before slicing.
Notes
You can customize the seasonings to taste.