

Table of Contents
No Bake Red Velvet Cake Balls: The Only Recipe You’ll Ever Need
Imagine craving a decadent dessert but dreading the oven’s heat on a sweltering summer day. That’s where No Bake Red Velvet Cake Balls come in as the ultimate solution—a quick, fuss-free treat that delivers all the rich, velvety flavors of traditional red velvet without any baking required. These no-bake red velvet cake balls are perfect for busy home cooks, offering a simple way to whip up 24 delightful bites in just over an hour. Whether you’re hosting a party or satisfying a sweet tooth, this recipe stands out for its extra creamy texture, thanks to the star ingredient: softened cream cheese that binds everything into a luxurious, melt-in-your-mouth experience. As the go-to guide on lalytarecipes.com, this is your definitive resource for mastering no bake red velvet cake balls with ease and confidence.
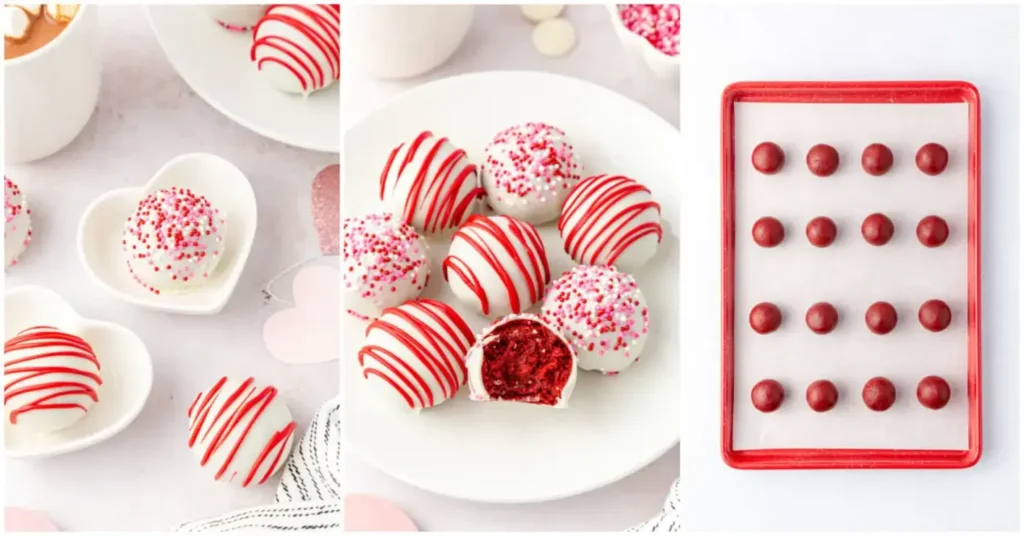
The allure of these no bake red velvet cake balls lies in their irresistible sensory appeal. Each bite reveals a harmonious blend of moist, crumbly red velvet cake mixed with the tangy creaminess of cream cheese, creating a soft, velvety interior that’s perfectly contrasted by a smooth, glossy chocolate coating. The aroma of melted white chocolate wafts through the air as you prepare them, evoking the festive spirit of holidays or special occasions. Texturally, they offer a delightful contrast—crispy on the outside from the chocolate shell and decadently soft inside, making every mouthful a textural adventure that keeps you coming back for more. It’s this combination of flavors and textures that makes no bake red velvet cake balls a standout easy no-bake dessert for any dessert lover.
What sets this No Bake Red Velvet Cake Balls recipe apart on lalytarecipes.com is the expertise of Chef Lalyta, whose tested methods ensure foolproof results every time. Drawing from years of culinary innovation, this version incorporates a Chef’s Secret that elevates the classic treat to new heights, focusing on the extra creamy binding from high-quality cream cheese for an unmatched mouthfeel. In this comprehensive guide, you’ll learn insider tips, step-by-step instructions, and practical advice for substitutions, storage, and serving, making it the single best resource online for home cooks. From ingredient spotlights to FAQs, we’re covering everything to help you succeed in the kitchen and impress your guests with these chocolate-coated cake balls.
Why This No Bake Red Velvet Cake Balls Recipe is a Game-Changer
The Chef’s Secret to these No Bake Red Velvet Cake Balls lies in the extra creamy texture achieved by incorporating softened cream cheese as the binding agent, which not only enhances the moisture but also adds a subtle tang that balances the sweetness of the red velvet crumbs. This technique ensures the mixture holds together perfectly without overworking it, resulting in tender, bite-sized balls that are far superior to standard recipes. By using full-fat cream cheese, we’re locking in that luxurious creaminess that makes each ball feel indulgent and homemade.
Unbeatable Texture: The science behind this texture comes from the emulsion properties of cream cheese, which blends seamlessly with the cake crumbs to create a stable, cohesive mixture. This prevents the balls from becoming dry or crumbly, as the fat content in the cream cheese helps retain moisture, leading to a silky-smooth interior that’s coated in a snappy chocolate layer—achieving the perfect contrast that elevates these no bake red velvet cake balls above ordinary desserts.
Foolproof for a Reason: This recipe has been rigorously tested multiple times in our kitchen to guarantee success, even for beginners. With straightforward steps and precise measurements, you’ll avoid common pitfalls like inconsistent chilling, ensuring your no bake red velvet cake balls turn out perfectly every time, making it a reliable staple for your dessert repertoire.
Ingredient Spotlight: Quality Makes the Difference
Red Velvet Cake Crumbs (2 cups): These form the base of your no bake red velvet cake balls, providing the signature deep red color and subtle cocoa flavor that defines this dessert. Using high-quality, store-bought or homemade red velvet cake ensures the crumbs are moist and flavorful, which is crucial for achieving the extra creamy texture. If your crumbs are dry, they won’t bind well, so opt for fresh ones. A tested substitution could be chocolate cake crumbs with a few drops of red food coloring for a similar visual effect, but it might alter the authentic red velvet taste slightly.
Cream Cheese (1/2 cup, softened): This is the hero ingredient that delivers the extra creamy angle, binding the crumbs into a smooth, dough-like consistency while adding a tangy contrast to the sweetness. Always choose full-fat, block-style cream cheese for the best results, as lower-fat versions can make the mixture watery and affect the texture. If you’re looking for a substitution, Greek yogurt works in a pinch for a lighter option, but it may introduce a tangier flavor—use it at room temperature to maintain that creamy binding power in your no bake red velvet cake balls.
White Chocolate Chips (1 cup for coating): These provide a luscious, glossy coating that seals in the flavors and adds a sweet, milky finish to your no bake red velvet cake balls. Quality matters here; choose high-cocoa butter chips for a smoother melt and better sheen. As a substitution, dark or milk chocolate chips can be used for a richer twist, but they will change the overall sweetness—melt them carefully to avoid seizing, which could ruin the coating’s consistency.
Sprinkles for Decoration (optional): While optional, sprinkles add a fun, festive touch to your no bake red velvet cake balls, enhancing visual appeal without altering the taste. Go for high-quality, colorful sprinkles to make your treats pop at parties. If you’d like alternatives, crushed nuts or edible glitter can provide a similar decorative effect, allowing for customization based on dietary needs or themes.
Step-by-Step Instructions
Step 1: Preparing the Red Velvet Cake Crumbs
In a large bowl, crumble the 2 cups of red velvet cake into fine crumbs using your hands or a fork. Ensure the crumbs are uniform in size to help them mix evenly with the other ingredients, avoiding any large chunks that could make the balls uneven. This step is key for the extra creamy texture we’re aiming for.
Pro Tip: If your cake is fresh, it’s easier to crumble; if it’s stale, lightly pulse it in a food processor for the perfect consistency, but don’t overdo it to preserve the moisture.
Step 2: Creating the Mixture
Add the 1/2 cup of softened cream cheese to the crumbs and mix thoroughly with a spoon or your hands until the mixture forms a cohesive, dough-like ball. This should take about 2-3 minutes of mixing to ensure the cream cheese is fully incorporated, giving you that signature extra creamy filling.
Common Mistake to Avoid: Overmixing can make the mixture too sticky and hard to roll, so stop as soon as it’s combined to keep the texture light and manageable in your no bake red velvet cake balls.
Step 3: Forming the Balls
Roll the mixture into 1-inch balls and place them on a baking sheet lined with parchment paper. Aim for uniformity in size to ensure even chilling and coating later—typically, this yields about 24 balls.
Pro Tip: Lightly wet your hands with water before rolling to prevent the mixture from sticking, which will help you achieve perfectly round shapes for your no bake red velvet cake balls.
Step 4: Melting the Chocolate Coating
Melt the 1 cup of white chocolate chips in a microwave-safe bowl by heating in 30-second intervals, stirring after each one until smooth and fully melted. This gentle method prevents the chocolate from burning or becoming grainy.
Common Mistake to Avoid: Overheating the chocolate can cause it to seize and harden, so always stir frequently and use short bursts to maintain that silky smoothness for coating your no bake red velvet cake balls.
Step 5: Coating the Balls
Dip each ball into the melted chocolate, using a fork or spoon to ensure it’s fully coated, then gently tap off any excess before placing it back on the parchment-lined baking sheet.
Pro Tip: For an even coating, let any excess chocolate drip off completely—this enhances the extra creamy interior by sealing in moisture without making the balls too heavy.
Step 6: Chilling and Decorating
Add sprinkles if desired, then refrigerate the coated balls for at least 1 hour until they are firm and easy to handle.
Common Mistake to Avoid: Rushing the chilling process can lead to soft balls that fall apart, so patience is key to achieving the perfect texture in your no bake red velvet cake balls.
Serving & Presentation
To make your no bake red velvet cake balls truly shine, focus on creative plating that enhances their vibrant red color and glossy coating. Arrange them on a tiered dessert platter for a visually striking display, perhaps nestled in festive cupcake liners for an added pop of elegance. For garnishes, consider a light dusting of powdered sugar or a drizzle of contrasting dark chocolate to highlight the extra creamy interior. These treats pair beautifully with a simple cup of coffee or a glass of chilled milk, complementing their rich flavors without overwhelming them. For a full dessert spread, serve alongside fresh fruit like strawberries to balance the sweetness, or as a delightful ending to a meal featuring American cuisine favorites like barbecue ribs, creating a memorable experience for your guests.
Make-Ahead & Storage Solutions
Make-Ahead Strategy: Prepare the mixture and form the balls up to 3 days in advance by storing them uncovered in the refrigerator after rolling. This allows the flavors to meld, enhancing the extra creamy texture—just wait to coat them in chocolate until the day you’re serving to keep the coating fresh and crisp.
Storing Leftovers: Store your no bake red velvet cake balls in an airtight container in the refrigerator for up to 1 week, or freeze them for up to 2 months to maintain maximum freshness. Use parchment paper between layers to prevent sticking and preserve that perfect chocolate shell.
The Best Way to Reheat: To restore the original texture and flavor, thaw frozen balls in the refrigerator overnight, then let them sit at room temperature for 10-15 minutes before serving. Avoid microwaving, as it can make the coating soft—room temperature recovery ensures they remain firm and delicious for your no bake red velvet cake balls.

Frequently Asked Questions (FAQ)
How do you make no bake red velvet cake balls without using an oven?
This recipe relies entirely on mixing, rolling, and chilling, making it perfect for oven-free preparation. Start by crumbling the red velvet cake and combining it with softened cream cheese, then coat the balls in melted chocolate and refrigerate. The extra creamy texture comes from the cream cheese, ensuring a delightful result without any heat, ideal for hot days or quick desserts.
What are some ingredient substitutions for no bake red velvet cake balls, like alternatives to red food coloring?
For red food coloring, you can use natural alternatives like beet juice or pomegranate powder to achieve a vibrant hue without artificial additives. Substitute cream cheese with Greek yogurt for a lighter version, or swap white chocolate chips with dark chocolate for a richer flavor. Always test substitutions in small batches to maintain the extra creamy binding and overall texture of your no bake red velvet cake balls.
How long do no bake red velvet cake balls need to chill in the refrigerator?
They need at least 1 hour of chilling to firm up, but for the best results and that perfect extra creamy center, aim for 2 hours. Chilling helps the flavors set and makes them easier to handle, ensuring your no bake red velvet cake balls maintain their shape and texture.
What are the best ways to serve or store no bake red velvet cake balls for a party?
For serving, present them on a decorative platter with garnishes like sprinkles or fresh berries to enhance their appeal, and pair with beverages like coffee for a balanced treat. For storage at a party, keep them in a cool spot or refrigerator if it’s warm, and cover loosely to prevent condensation. This keeps your no bake red velvet cake balls fresh and ready for guests throughout the event.
Can these no bake red velvet cake balls be made ahead for events?
Absolutely! Prepare the balls up to 3 days in advance and store them in the refrigerator before coating. This make-ahead approach allows the extra creamy mixture to set properly, making party prep stress-free while ensuring they taste fresh when served.
Are no bake red velvet cake balls suitable for kids or dietary restrictions?
Yes, they’re kid-friendly due to their fun, bite-sized nature, but for dietary needs, use gluten-free cake crumbs if required. For vegan options, substitute cream cheese with a plant-based alternative and use dairy-free chocolate—the extra creamy texture can still be achieved with the right swaps.
What variations can I try with no bake red velvet cake balls?
Experiment with add-ins like crushed cookies for crunch or flavored extracts for a twist, such as peppermint for holidays. This keeps the core extra creamy profile intact while allowing personalization to suit different tastes in your no bake red velvet cake balls.
Tried This Recipe? Leave a Comment!
Did you make this recipe? I’d love to hear how it turned out! Please leave a comment and a rating below. Your feedback helps other home cooks and supports lalytarecipes.com!
For more delicious inspiration, follow me on Pinterest!

No Bake Red Velvet Cake Balls
- Total Time: 1 hour 15 minutes
- Yield: 24 balls 1x
Description
Delicious no-bake dessert balls made from red velvet cake crumbs mixed with cream cheese and coated in chocolate.
Ingredients
- 2 cups red velvet cake crumbs
- 1/2 cup cream cheese, softened
- 1 cup white chocolate chips for coating
- Sprinkles for decoration (optional)
Instructions
- Step 1: In a large bowl, crumble the red velvet cake into fine crumbs.
- Step 2: Add the softened cream cheese to the crumbs and mix until well combined.
- Step 3: Roll the mixture into 1-inch balls and place them on a baking sheet lined with parchment paper.
- Step 4: Melt the white chocolate chips in a microwave-safe bowl, heating in 30-second intervals and stirring until smooth.
- Step 5: Dip each ball into the melted chocolate, ensuring it's fully coated, then place back on the baking sheet.
- Step 6: Add sprinkles if desired, and refrigerate for at least 1 hour until firm.
Notes
These cake balls can be stored in an airtight container in the refrigerator for up to 1 week. For a festive touch, use red velvet flavored items.
- Prep Time: 15 minutes
- Cook Time: 0 minutes
- Method: Dessert
- Cuisine: American
Nutrition
- Calories: 150
- Sugar: 10g
- Fat: 8g
- Carbohydrates: 15g
- Protein: 2g
Conclusion
These No Bake Red Velvet Cake Balls deliver a rich, velvety chocolate flavor with a creamy center, making them the perfect easy dessert for any occasion. They’re ideal for parties, holiday gatherings, or a quick sweet treat to brighten your day. For a fun variation, try coating them in different chocolates or adding sprinkles for extra flair, and if you’re craving more no-bake options, you might also love the Easy Peanut Butter Balls with Cream Cheese or the Best Red Velvet Macarons Recipe.


