Perfect Mini Creme Brulee Cheesecakes Recipe: Elegant Bites for Any Occasion
These Perfect Mini Creme Brulee Cheesecakes combine two classic desserts into one showstopping treat. Imagine creamy cheesecake filling with a crackly caramelized sugar topping, all in a convenient individual portion. Whether you need an elegant dinner party dessert or a special weekend indulgence, this recipe delivers impressive results with manageable steps.
The magic happens when rich cream cheese meets the signature burnt sugar crust of traditional creme brulee. Each bite offers contrasting textures from the smooth filling to the crisp topping. Furthermore, the mini format makes these desserts perfect for portion control while still feeling indulgent. You will love how the vanilla and caramel notes complement each other in every spoonful.
Quick Recipe Highlights
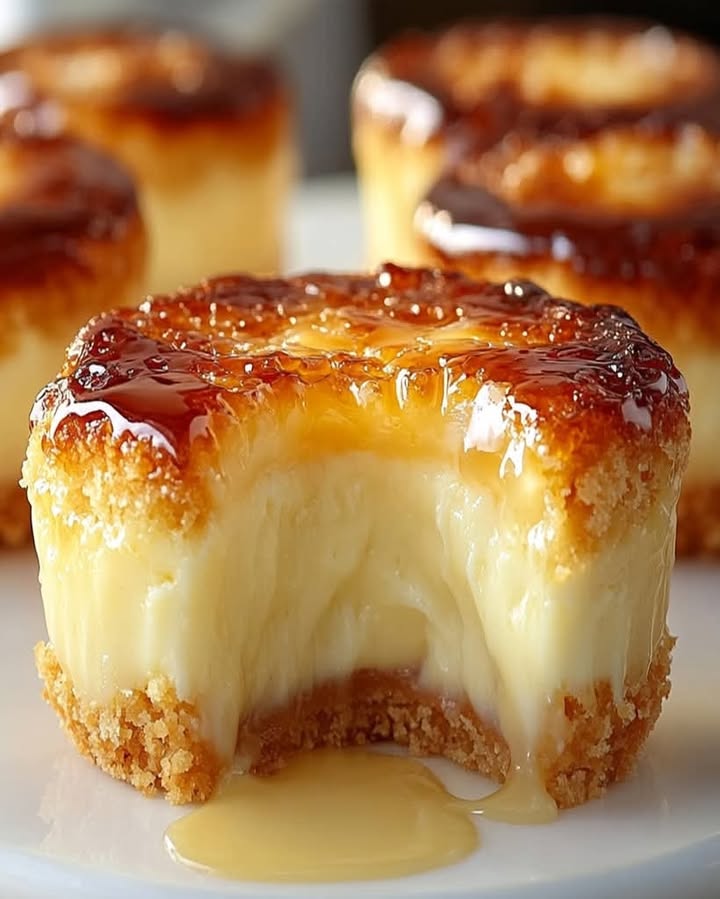
- Flavor Profile: The Perfect Mini Creme Brulee Cheesecakes Recipe balances sweet vanilla cheesecake with deep caramelized sugar notes. A hint of lemon zest brightens the richness.
- Texture: Expect velvety smooth filling beneath a glass-like sugar crust. The graham cracker base adds pleasant crunch.
- Aroma: Warm vanilla and caramel scents will fill your kitchen as these bake. The torched sugar topping releases an irresistible toasty fragrance.
- Visual Appeal: Golden-brown tops contrast beautifully with pale yellow filling in elegant ramekins. The crackled sugar surface invites immediate tasting.
- Skill Level Needed: Basic baking skills suffice, though torching sugar requires careful attention. The recipe guides you through each technique.
- Special Equipment: You will need a kitchen torch, ramekins, and a muffin tin for the water bath. A fine-mesh sieve ensures lump-free filling.
Recipe Overview
- Difficulty Level: While not beginner-level, this Perfect Mini Creme Brulee Cheesecakes Recipe breaks into manageable steps. The water bath prevents cracking, and the torch technique becomes easy with practice.
- Category: These individual desserts fit special occasions, holiday meals, or upscale gatherings. They work as dinner party finales or celebratory treats.
- Cuisine: The recipe blends French creme brulee techniques with American cheesecake traditions. It represents fusion dessert innovation.
- Cost: Using common baking ingredients keeps costs reasonable. The most significant investment might be ramekins if you do not own them already.
- Season: These shine year-round but feel particularly fitting for fall and winter holidays. The warm flavors complement cooler weather.
- Occasion: Serve these at dinner parties, anniversary celebrations, or holiday meals. They also make impressive edible gifts when packaged beautifully.
Why You’ll Love This Recipe
The Perfect Mini Creme Brulee Cheesecakes Recipe solves common dessert dilemmas. First, individual portions eliminate messy slicing while ensuring everyone gets picture-perfect servings. Second, the make-ahead nature means less stress when entertaining. You can prepare these up to two days before your event.
Texture lovers will appreciate the interplay between components. The creamy cheesecake contrasts with the brittle sugar crust and crunchy base. Each element brings distinct mouthfeel that keeps every bite interesting. Additionally, the vanilla-forward flavor profile pleases diverse palates without overwhelming sweetness.
From a practical perspective, these mini desserts travel better than full-sized cheesecakes. The ramekins protect delicate fillings during transport to potlucks or parties. Moreover, the small size allows for easier storage in crowded refrigerators compared to bulky springform pans.
Nutritionally, you control portion sizes with these individual treats. While still indulgent, the mini format helps with mindful eating. You can enjoy dessert without overdoing it. The protein-rich cream cheese also provides more satiety than many other sweets.
Finally, the wow factor outweighs the effort required. Guests always react to the dramatic sugar-torching moment. The recipe delivers restaurant-quality presentation with home kitchen ingredients. Once you master the technique, you will find yourself making these for every special occasion.
Historical Background and Cultural Significance
Creme brulee traces its origins to 17th century France, where chefs perfected the technique of caramelizing sugar atop rich custard. The dessert gained popularity in elite circles before spreading globally. Meanwhile, cheesecake has ancient roots dating back to Greek athletes and Roman feasts. Modern cream cheese-based versions emerged in America during the 19th century.
This Perfect Mini Creme Brulee Cheesecakes Recipe represents a contemporary fusion of these two dessert traditions. Pastry chefs began experimenting with hybrid desserts in the 1990s, seeking to combine beloved textures and flavors. The miniaturized version makes the concept more accessible for home cooks.
In French cuisine, the crackly sugar top demonstrates technical skill. The audible “crack” when breaking the surface provides sensory pleasure before tasting. American cheesecake brings comforting familiarity and rich mouthfeel. Together, they create cross-cultural dessert harmony that feels both innovative and nostalgic.
Regional variations might include different crust options or flavor infusions. Some versions incorporate local ingredients like maple syrup or citrus zest. The basic formula remains adaptable to personal tastes while maintaining its essential contrasting textures.
Ingredient Deep Dive
Cream cheese forms the foundation of these Perfect Mini Creme Brulee Cheesecakes. Originating in New York dairy farms, this ingredient provides structure and richness. Always use full-fat blocks rather than tubs for proper consistency. The higher fat content prevents graininess and ensures smooth texture. Bring it to room temperature before mixing to avoid lumps.
Granulated sugar serves multiple roles in the recipe. It sweetens the filling while creating the signature brulee topping. When caramelized, sugar undergoes the Maillard reaction, developing complex flavors beyond simple sweetness. Superfine sugar works best for torching as it melts evenly without burning.
Eggs act as the binding agent, giving structure to the cheesecake filling. The proteins coagulate during baking, setting the mixture without making it rubbery. Fresh eggs at room temperature incorporate more evenly into the batter. They also contribute to the velvety mouthfeel.
Graham crackers make an ideal base for their honeyed flavor and sturdy texture. Crushed fine and mixed with butter, they form a crisp foundation that contrasts the creamy filling. For variations, try substituting gingersnaps or chocolate wafer cookies.
Vanilla extract provides aromatic depth to balance the richness. Pure vanilla offers superior flavor to imitation versions. The tiny black specks in quality vanilla also enhance visual appeal. Consider scraping a vanilla bean for maximum fragrance if you want to elevate the recipe further.
Common Mistakes to Avoid
- Overmixing the batter incorporates too much air, causing cracks during baking. Mix just until ingredients combine smoothly.
- Skipping the water bath leads to uneven baking and tough texture. The steam creates gentle, consistent heat.
- Torching sugar too close creates burnt spots. Hold the flame several inches above the surface for even caramelization.
- Using cold ingredients results in lumpy batter. Plan ahead to bring everything to room temperature.
- Overbaking makes the filling dry. The centers should still jiggle slightly when removing from oven.
- Chilling insufficiently prevents proper setting. Allow at least four hours in the refrigerator before serving.
- Adding toppings too soon causes sogginess. Only torch the sugar right before serving for maximum crackle.
- Neglecting to tap out air bubbles leaves unattractive holes in the finished texture.
Essential Techniques
The water bath method, called bain-marie in professional kitchens, protects delicate custards from direct heat. Place the ramekins in a roasting pan and pour hot water halfway up their sides before baking. This technique ensures gentle, even cooking that prevents cracks and rubbery texture. The water should be very hot but not boiling when added.
Proper torching creates the perfect caramelized sugar crust. Sprinkle an even layer of superfine sugar over chilled cheesecakes. Hold the kitchen torch at a 45-degree angle several inches from the surface. Move constantly in circular motions until the sugar melts and turns amber. Allow it to harden for about a minute before serving.
Testing doneness requires observation rather than timing. The edges should appear set while the center maintains a slight wobble when gently shaken. Residual heat will continue cooking the cheesecakes as they cool. Overbaking leads to dry, crumbly texture rather than creamy smoothness.
Pro Tips for Perfect Mini Creme Brulee Cheesecakes
- Line your baking pan with a towel to prevent ramekins from sliding during water bath addition.
- Strain the filling through a sieve for ultra-smooth texture without any lumps.
- Chill the baked cheesecakes thoroughly before torching to prevent melting the filling.
- Use a small offset spatula to loosen edges if any sugar sticks to the ramekin.
- Experiment with flavored sugars like vanilla-infused or citrus-zest blends for topping.
- For deeper flavor, brown the butter when making the graham cracker crust.
- Keep extra sugar nearby for re-torching if guests want thicker caramel layers.
Variations and Adaptations
For seasonal twists, infuse the filling with complementary flavors. In fall, add pumpkin puree and warm spices to the batter. Winter holidays might inspire peppermint or eggnog variations. Spring calls for bright citrus zest, while summer welcomes berry swirls or tropical fruit purees.
Dietary adaptations maintain the spirit of the recipe while accommodating restrictions. Gluten-free graham crackers or nut flour crusts work beautifully. Dairy-free versions can use high-quality vegan cream cheese alternatives. For lower sugar options, reduce the sweetener in the filling and use a thin brulee topping.
Presentation variations allow for creative expression. Try serving in edible chocolate cups instead of ramekins for extra decadence. Layer the components in clear glasses for a deconstructed version. Garnish with fresh fruit, edible flowers, or chocolate shavings to match your theme.
Serving and Presentation Guide
Timing matters when serving these Perfect Mini Creme Brulee Cheesecakes. Torch the sugar tops just before presenting to preserve the dramatic crackle. Allow about five minutes after torching for the sugar to harden properly. Serve on small plates with decorative doilies or slate boards for elegant presentation.
Temperature contrast enhances the experience. The chilled cheesecake against the warm caramelized sugar creates sensory interest. Provide small dessert spoons that can easily break through the sugar crust. Consider pre-scoring the tops with the back of a spoon to make the first bite easier for guests.
Garnishes should complement rather than overwhelm. A single raspberry, mint sprig, or gold leaf adds visual pop without competing with the main flavors. Dusting plates with cocoa powder or cinnamon creates professional-looking presentation. For parties, consider setting up a DIY torching station so guests can customize their sugar thickness.
Wine and Beverage Pairing
Dessert wines make excellent companions for these rich cheesecakes. Try a late-harvest Riesling with its honeyed apricot notes that mirror the caramel flavors. Ice wine’s concentrated sweetness stands up to the dessert’s richness. For red wine lovers, a ruby port offers dark fruit flavors that complement without overpowering.
Coffee and tea selections should balance the sweetness. A bold espresso cuts through the richness with its bitterness. Chai tea’s warm spices echo any cinnamon in the crust. For cold options, vanilla bean iced coffee or sparkling water with citrus slices provide refreshing contrast.
Cocktail pairings can turn dessert into a celebration. A vanilla bourbon old fashioned mirrors the dessert’s caramel notes. For something lighter, a prosecco float with a scoop of sorbet cleanses the palate between bites. Non-alcoholic sparkling cider offers similar effervescence without alcohol.
Storage and Shelf Life
Proper storage maintains quality for these delicate desserts. Keep untorched cheesecakes covered in the refrigerator for up to three days. The sugar topping should only be added before serving to prevent sogginess. Place parchment between layers if stacking in containers to protect the surfaces.
Freezing works well for make-ahead convenience. Wrap individual cheesecakes tightly in plastic wrap, then foil. They keep for up to two months frozen. Thaw overnight in the refrigerator before torching. The texture may become slightly denser after freezing but remains delicious.
Signs of spoilage include off odors, mold growth, or separated texture. Properly stored cheesecakes should maintain consistent color and aroma. When in doubt, discard any that develop unusual characteristics. The high dairy content makes food safety a priority.
Make Ahead Strategies
Advanced preparation simplifies entertaining with this recipe. Bake the cheesecakes up to two days before your event, keeping them covered in the refrigerator. Prepare the crusts even earlier, storing them at room temperature for up to three days. The filling can be mixed and refrigerated overnight before baking if needed.
For large gatherings, stagger your baking. Prepare multiple batches over several days, storing them properly between steps. The torching step remains the only element requiring last-minute attention. This approach prevents kitchen overload when hosting.
Consider pre-measuring dry ingredients and lining pans in advance. Having everything ready streamlines the baking process. Label containers clearly if preparing components days ahead to avoid confusion. Organization ensures stress-free dessert preparation when guests arrive.
Scaling Instructions
Adjusting batch sizes requires careful calculation. For halving the recipe, use six standard ramekins and reduce baking time by about five minutes. When doubling, you may need to bake in batches unless your oven accommodates multiple pans. Rotate pans halfway through for even cooking in crowded ovens.
Equipment considerations matter when scaling. Ensure you have enough ramekins and roasting pan space for water baths. A larger torch fuel canister prevents mid-task refills for big batches. Consider renting or borrowing equipment if making dozens for events.
Timing adjustments prevent overbaking when changing quantities. Smaller batches may cook faster, while larger ones could need extra minutes. Watch for visual doneness cues rather than strictly following original times. Record any modifications for future reference.
Nutritional Deep Dive
These indulgent treats provide more than just empty calories. The cream cheese offers protein and calcium, while eggs contribute vitamins A and D. Using quality ingredients maximizes nutritional benefits despite the dessert classification. Portion control helps balance enjoyment with health consciousness.
Macronutrient breakdown shows expected dessert profiles. Each serving contains carbohydrates from the crust and sugar, with moderate fat from dairy. The protein content helps moderate blood sugar spikes compared to flour-based desserts. Balancing with lighter meals makes room for occasional indulgence.
Mindful eating enhances the experience. Savoring each bite slowly allows satisfaction with smaller portions. The rich flavors naturally encourage slower consumption than overly sweet alternatives. This approach aligns with intuitive eating principles while enjoying special treats.
Dietary Adaptations
Gluten-free versions simply require substituting the graham crackers. Many brands offer gluten-free alternatives with similar texture and flavor. Almond flour crusts provide another option with added protein. Ensure all other ingredients meet gluten-free standards if serving celiac guests.
Dairy-free adaptations use plant-based cream cheeses and butter substitutes. Coconut cream can supplement texture in vegan versions. The brulee topping remains naturally dairy-free. Test different brands to find the best melting and flavor properties for your preferences.
Reduced-sugar options modify both the filling and topping. Sugar substitutes that caramelize work for the brulee layer. The filling can tolerate some sweetener reduction without sacrificing texture. Increasing vanilla or adding spice boosts perceived sweetness with less sugar.
Troubleshooting Guide
Cracked surfaces typically indicate rapid temperature changes. Prevent this by cooling cheesecakes gradually in the oven with the door ajar. If cracks appear, disguise them with garnishes or extra brulee topping. The flavor remains unaffected by cosmetic imperfections.
Grainy texture results from undermixing or overbaking. Ensure all ingredients reach room temperature before combining. Straining the batter eliminates any stubborn lumps. Proper water bath technique prevents the protein overcoagulation that causes graininess.
Uneven caramelization happens when torching inconsistently. Maintain steady flame movement and consistent distance from the surface. If some areas burn while others remain pale, scrape off and reapply sugar for a second attempt. Practice improves technique over time.
Recipe Success Stories
Home bakers report impressive results with this Perfect Mini Creme Brulee Cheesecakes Recipe. Many describe amazed reactions from dinner guests who assume professional pastry chefs created the desserts. The wow factor consistently exceeds expectations for the actual effort involved.
Adaptation successes include creative flavor variations. One baker infused lavender into the filling for a floral twist. Another added espresso powder to the crust for mocha lovers. The basic recipe welcomes personalization while maintaining its essential appeal.
First-time torch users often express initial hesitation that quickly turns to confidence. After the first successful batch, many find themselves looking for other recipes requiring the technique. The satisfying crack of properly caramelized sugar becomes addictive.
Frequently Asked Questions
Can I use a broiler instead of a torch? Yes, though with less control. Place sugared cheesecakes under a preheated broiler for 1-2 minutes, watching closely to prevent burning. Rotate for even coloring.
How do I prevent water bath leakage? Wrap ramekins tightly in foil before placing in water. Alternatively, place them in a sealable plastic bag with the top above water level.
Why did my sugar topping melt into the filling? This happens if the cheesecakes aren’t thoroughly chilled before torching. Ensure at least 4 hours refrigeration time.
Can I make one large cheesecake instead? Yes, but adjust baking time to 50-60 minutes for a 9-inch springform pan. The crust-to-filling ratio will differ slightly.
How thick should the sugar layer be? About 1/8 inch provides ideal crackle without overwhelming sweetness. Adjust to personal preference.
What if I don’t have superfine sugar? Pulse regular granulated sugar in a blender briefly to create a finer texture. This helps with even melting.
Can I prepare these without eggs? Egg substitutes may work but will alter texture. The filling may not set as firmly without eggs’ binding properties.
How do I transport these safely? Use a rigid container with dividers or non-slip liner. Keep chilled with ice packs and torch on-site if possible.
Why does my filling sink after baking? Overmixing incorporates too much air. Also ensure your oven temperature is accurate with an independent thermometer.
Can I reuse the ramekins for other purposes? Absolutely. These versatile dishes work for individual pot pies, soufflés, or even as stylish candle holders when cleaned properly.
Additional Resources
Expand your dessert repertoire with related recipes that use similar techniques. Classic creme brulee offers pure custard experience without the cheesecake element. New York-style cheesecake provides the traditional version for comparison. Both help build foundational skills for this hybrid creation.
Technique guides for water bath baking and sugar torching provide valuable supplemental information. Many culinary schools offer online tutorials demonstrating proper methods. Bookmark reliable sources for quick reference when trying new variations.
Equipment recommendations ensure you have the right tools. Invest in a quality kitchen torch with adjustable flame control. Ramekin sets in various sizes allow for presentation options. A reliable oven thermometer prevents temperature-related baking issues.
PrintPerfect Mini Creme Brulee Cheesecakes
Description
Delicate mini cheesecakes with a creamy creme brulee topping, perfect for any occasion.
Ingredients
For the Crust:
- 1 1/2 cups graham cracker crumbs
- 1/4 cup melted butter
- 2 tablespoons granulated sugar
- 16 oz cream cheese, softened
- 1/2 cup granulated sugar
- 2 large eggs
- 1 teaspoon vanilla extract
- 1/4 cup sour cream
- 1/4 cup brown sugar
- 1/4 cup granulated sugar (for topping)
Instructions
1. Prepare the Crust:
- Preheat oven to 325°F (160°C). Line a muffin tin with cupcake liners.
- Mix graham cracker crumbs, melted butter, and 2 tablespoons sugar. Press into the bottom of each liner.
- Beat cream cheese and 1/2 cup sugar until smooth. Add eggs one at a time, then vanilla and sour cream.
- Divide batter evenly among liners. Bake for 20-25 minutes until set. Cool completely.
- Mix brown sugar and remaining granulated sugar. Sprinkle over cheesecakes and caramelize with a kitchen torch.
- Chill for at least 1 hour before serving.
Notes
You can customize the seasonings to taste.


