

Table of Contents
Red Velvet Oreo Cheesecake: The Only Recipe You’ll Ever Need
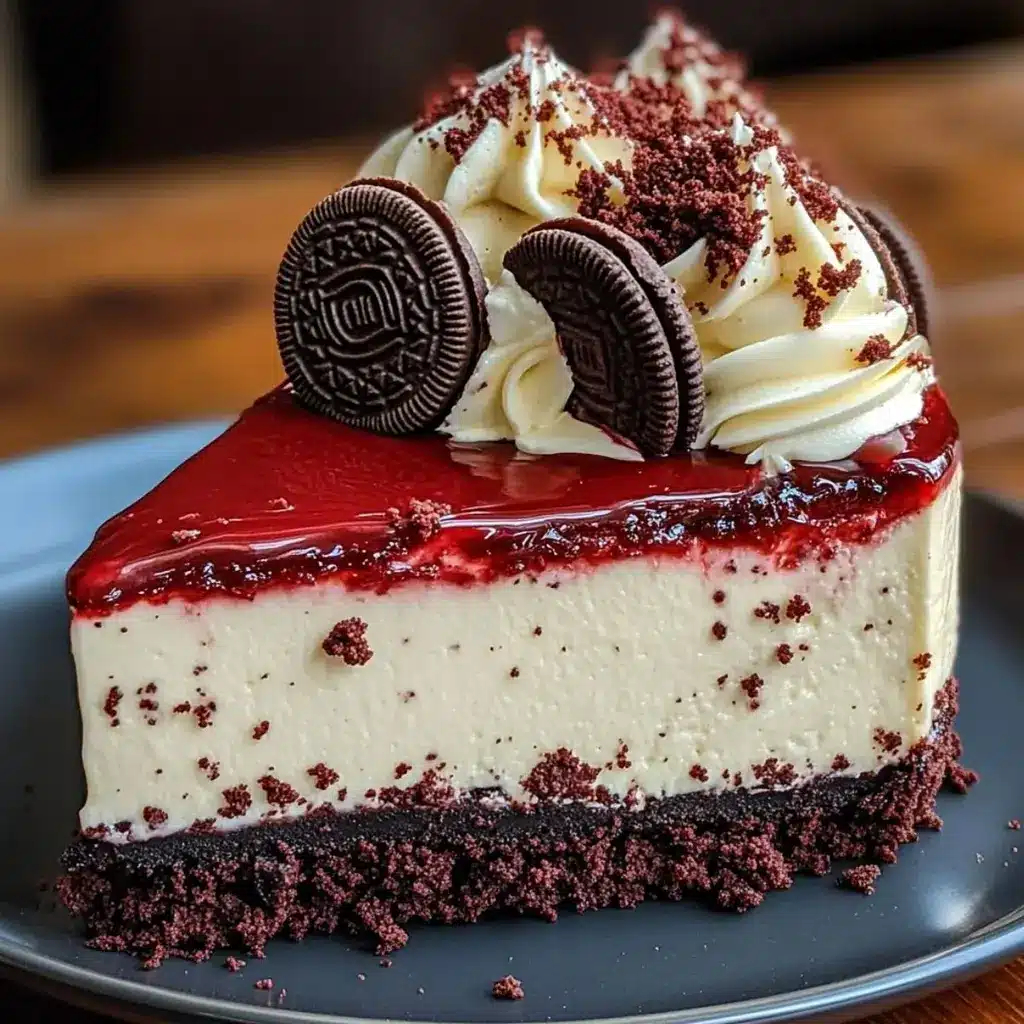
Imagine biting into a slice of Red Velvet Oreo Cheesecake that’s so irresistibly creamy and packed with crunchy Oreo surprises that it becomes your go-to dessert for any occasion. This Red Velvet Oreo Cheesecake recipe from lalytarecipes.com combines the classic tang of red velvet with layers of Oreo goodness, creating an ultra-creamy Oreo fusion that elevates every bite. Whether you’re a home baker tackling your first cheesecake or a seasoned pro, this foolproof guide ensures stunning results every time. With its vibrant red hue and hidden Oreo crumbles, it’s not just a dessert—it’s a showstopper that solves the eternal craving for something indulgent yet easy to make at home.
The allure of this Red Velvet Oreo Cheesecake lies in its symphony of textures and flavors: the silky smoothness of the cheesecake filling contrasts beautifully with the crisp, chocolatey Oreo crust and the scattered bits of Oreo throughout, offering a delightful crunch in every forkful. Picture the rich, velvety red base mingling with the sweet, buttery notes of Oreos, releasing an aroma that’s a perfect blend of vanilla and cocoa as it bakes. This ultra-creamy Oreo fusion doesn’t just satisfy your sweet tooth; it delivers a moist, dense interior that’s balanced by the slight tang from the cream cheese, making each slice a textural adventure that feels luxurious and homemade.
What sets this Red Velvet Oreo Cheesecake recipe apart on lalytarecipes.com is the expertise of Chef Lalyta, whose tested techniques and secret twists ensure it’s the single best resource for mastering this dessert. You’ll learn insider tips, from achieving that perfect bake to creative serving ideas, all while avoiding common pitfalls. Dive in for comprehensive guidance that builds your confidence in the kitchen, including our Chef’s Secret for an even creamier finish. This isn’t just another recipe—it’s your pathway to baking success with minimal effort and maximum wow factor.
Why This Red Velvet Oreo Cheesecake Recipe is a Game-Changer
The Chef’s Secret: Our unique angle is the double Oreo infusion technique, which incorporates crushed Oreos not just in the crust but also directly into the filling for an ultra-creamy Oreo fusion that sets this Red Velvet Oreo Cheesecake apart. By folding in extra Oreo crumbles, we create pockets of texture that enhance the creaminess without compromising the smooth base, making every slice decadently layered and moreish. This method, refined through multiple tests, ensures the Oreos distribute evenly, adding a subtle crunch that contrasts beautifully with the velvety red velvet essence.
Unbeatable Texture: The science behind the texture comes from using full-fat ingredients like cream cheese and sour cream, which emulsify during baking to lock in moisture and prevent cracking. This ultra-creamy Oreo fusion relies on the proteins in the eggs and cream cheese to form a stable structure, while the red food coloring adds vibrancy without altering the pH balance, resulting in a firm yet luscious cheesecake that’s sliceable and retains its shape.
Foolproof for a Reason: This Red Velvet Oreo Cheesecake recipe has been perfected through rigorous testing, guaranteeing success even for novice bakers. We address potential issues like overbaking or uneven mixing, providing precise measurements and tips to ensure consistent results every time, making it a reliable staple for your dessert repertoire.
Ingredient Spotlight: Quality Makes the Difference
For the crust, start with 2 cups of crushed Oreo cookies—these provide the foundational crunch and chocolatey base that defines this Red Velvet Oreo Cheesecake. Quality matters here because fresh, name-brand Oreos offer the perfect balance of cookie and cream, ensuring a sturdy yet flavorful layer. Their role is to absorb moisture from the melted butter, creating a barrier that prevents sogginess. If you’re out of Oreos, substitute with crushed chocolate graham crackers for a similar effect, but note that it might slightly alter the iconic Oreo taste.
Melted unsalted butter (1/4 cup) acts as the binding agent for the crust, helping it hold together while adding richness. Opt for high-quality, European-style butter for its higher fat content, which enhances the flavor and texture. In this ultra-creamy Oreo fusion, butter ensures the crust doesn’t become greasy; a common mistake is using salted butter, which can make the dessert overly salty. For a dairy-free swap, use coconut oil, but reduce the quantity slightly to avoid a greasy outcome.
Cream cheese (24 oz, softened) is the heart of the filling, providing that signature creamy texture in our Red Velvet Oreo Cheesecake. Full-fat versions yield the best results, as they contribute to the ultra-creamy consistency without curdling. It binds all elements together for a smooth, velvety finish. If substituting, try a blend of Greek yogurt and ricotta, but be cautious as it may make the cheesecake less firm—adjust with an extra egg for stability.
Granulated sugar (1 cup) sweetens the filling while helping to aerate it during mixing, contributing to the light yet dense texture of this recipe. Use pure cane sugar for even dissolving and a cleaner taste. In our ultra-creamy Oreo fusion, it balances the tartness of the cream cheese. For a lower-calorie option, swap with coconut sugar, though it will impart a slight caramel note that changes the flavor profile.
Sour cream (1 cup) adds tang and moisture, enhancing the ultra-creamy Oreo fusion in this Red Velvet Oreo Cheesecake. Full-fat sour cream prevents the filling from drying out during baking. It plays a key role in achieving that perfect, scoopable consistency. Substitute with plain Greek yogurt for a healthier twist, but strain it first to remove excess liquid and maintain the cheesecake’s structure.
Eggs (4 large) act as emulsifiers, binding the ingredients and providing structure for a stable bake. Fresh, room-temperature eggs ensure even incorporation, crucial for the creamy texture in this Red Velvet Oreo Cheesecake. They help create that signature jiggle without cracking. For an egg-free version, use aquafaba or a commercial egg replacer, but test for doneness earlier as the texture may vary.
Red food coloring (1 tablespoon) gives the vibrant hue that makes this Red Velvet Oreo Cheesecake visually stunning. Opt for gel-based coloring for potency without watering down the batter. It enhances the recipe’s appeal without affecting taste. If avoiding artificial dyes, use natural beet juice, though it might slightly alter the color intensity.
Vanilla extract (1 teaspoon) infuses a warm, aromatic note that complements the chocolatey Oreos in our ultra-creamy fusion. Pure vanilla extract is essential for authentic flavor—imitation versions can taste artificial. It rounds out the filling’s sweetness. Substitute with almond extract for a nutty variation, but use half the amount to prevent overpowering the other flavors.
Crushed Oreo cookies for mixing (1 cup) add the extra layer of surprise in this Red Velvet Oreo Cheesecake, enhancing the ultra-creamy texture with bursts of crunch. Fresh crumbs ensure they don’t dissolve completely. They provide textural contrast. If needed, swap with crushed chocolate wafers, but maintain the quantity for the signature Oreo effect.
Step-by-Step Instructions for Red Velvet Oreo Cheesecake
Step 1: Preparing the Oven and Pan
Preheat the oven to 325°F (163°C) and grease a 9-inch springform pan to ensure easy release later. This step is crucial for even baking and preventing sticking.
Pro Tip: Always use a water bath for cheesecakes to maintain humidity, which helps achieve that ultra-creamy Oreo fusion without cracks—wrap your pan in foil before placing it in a larger roasting pan.
Step 2: Creating the Oreo Crust
In a bowl, mix the 2 cups of crushed Oreo cookies with 1/4 cup of melted unsalted butter until fully combined. Press this mixture firmly into the bottom of the prepared pan and bake for 10 minutes to set it.
Common Mistake to Avoid: Over-mixing the crust can make it too dense; gently combine to keep it crumbly, and ensure the pan is evenly lined to avoid a lopsided Red Velvet Oreo Cheesecake.
Step 3: Preparing the Cheesecake Filling
In a large mixing bowl, beat the 24 oz of softened cream cheese until smooth and creamy. Gradually add 1 cup of granulated sugar, 1 cup of sour cream, 4 large eggs, 1 tablespoon of red food coloring, and 1 teaspoon of vanilla extract, mixing on low speed until just combined to avoid incorporating too much air.
Pro Tip: Let all ingredients come to room temperature first for a smoother blend, enhancing the ultra-creamy texture in your Red Velvet Oreo Cheesecake.
Step 4: Incorporating the Oreo Mix-Ins
Fold in the 1 cup of crushed Oreo cookies gently into the filling mixture using a spatula, then pour the batter evenly over the pre-baked crust in the pan.
Common Mistake to Avoid: Over-folding can break down the Oreos too much; fold just until distributed for those perfect crunchy pockets in your ultra-creamy Oreo fusion.
Step 5: Baking the Cheesecake
Bake the cheesecake for 55-65 minutes or until the center is set but still slightly jiggly. Once done, turn off the oven and let it cool inside with the door slightly open for about an hour to prevent sudden temperature changes.
Pro Tip: Check for doneness by gently shaking the pan; the edges should be firm while the center wobbles, ensuring your Red Velvet Oreo Cheesecake has that signature creamy interior.
Step 6: Chilling and Serving
Refrigerate the cheesecake for at least 4 hours, ideally overnight, to allow it to fully set and develop flavors.
Common Mistake to Avoid: Rushing the chilling process can lead to a runny texture; patience is key for the best results in this ultra-creamy Oreo fusion.
Serving & Presentation
Elevate your Red Velvet Oreo Cheesecake with creative plating by dusting the top with powdered sugar or a sprinkle of extra crushed Oreos for added visual appeal and texture. Slice it neatly using a warm knife for clean edges, revealing the vibrant red layers and Oreo surprises inside. For an impressive garnish, add fresh berries like raspberries or strawberries to contrast the richness, or drizzle with chocolate sauce for a decadent touch. This dessert pairs wonderfully with a light coffee or a scoop of vanilla ice cream, making it ideal for holidays, birthdays, or casual gatherings, where its ultra-creamy Oreo fusion shines as a standalone treat or a complement to a fruit-based salad.
Make-Ahead & Storage Solutions
For make-ahead strategy, prepare the crust up to 3 days in advance and store it in the sealed pan in the fridge; mix the filling the day before and keep it covered in the refrigerator, then assemble and bake when ready. This allows flavors to meld, enhancing the ultra-creamy Oreo fusion in your Red Velvet Oreo Cheesecake. For storing leftovers, cover the cheesecake tightly with plastic wrap or transfer slices to an airtight container; it stays fresh in the fridge for up to 5 days. To freeze, wrap individual slices in freezer-safe wrap and store for up to 2 months—thaw overnight in the fridge. The best way to reheat is gently in the microwave for 10-15 seconds per slice to restore the creamy texture without melting the Oreos.
Frequently Asked Questions (FAQ)
How do you make the Oreo crust for Red Velvet Oreo Cheesecake?
To make the Oreo crust, crush 2 cups of Oreo cookies and mix with 1/4 cup of melted unsalted butter. Press this into a greased 9-inch springform pan and bake at 325°F for 10 minutes. This step creates a sturdy base that complements the ultra-creamy filling, ensuring your Red Velvet Oreo Cheesecake has the perfect contrast of textures.
What can I substitute for cream cheese in Red Velvet Oreo Cheesecake?
While cream cheese is ideal for that authentic ultra-creamy texture, you can substitute it with a mixture of 24 oz of ricotta and Greek yogurt (equal parts) for a tangier version. For a dairy-free option, use cashew-based cream cheese alternatives, but add an extra egg to maintain structure, as this might affect the firmness of your Red Velvet Oreo Cheesecake.
How long does it take to bake Red Velvet Oreo Cheesecake?
Baking time for Red Velvet Oreo Cheesecake is 55-65 minutes at 325°F, followed by cooling in the oven for about an hour. The total time includes preparation and chilling, making it a 4 hours 30 minutes commitment overall, but the wait is worth it for the perfect, set ultra-creamy center.
What are some good serving ideas for Red Velvet Oreo Cheesecake?
Serve Red Velvet Oreo Cheesecake chilled on a decorative platter, garnished with whipped cream and fresh fruit for a pop of color. It’s excellent as a finale to a dinner party, paired with coffee or wine, or even as a birthday cake alternative—cut into smaller bars for easier sharing during events.
Can I add extra flavors to Red Velvet Oreo Cheesecake?
Yes, you can enhance the flavor by adding a teaspoon of espresso powder to the filling for a mocha twist, or incorporate white chocolate chips for added sweetness. Be mindful of quantities to maintain the balance in this ultra-creamy Oreo fusion.
Is Red Velvet Oreo Cheesecake suitable for beginners?
Absolutely, as long as you follow the step-by-step instructions closely. This recipe is designed to be foolproof, with tips to avoid common mistakes, making it accessible for beginners to create a stunning Red Velvet Oreo Cheesecake on their first try.
Tried This Recipe? Leave a Comment!
Did you make this recipe? I’d love to hear how it turned out! Please leave a comment and a rating below. Your feedback helps other home cooks and supports lalytarecipes!
For more delicious inspiration, follow me on Pinterest!
Red Velvet Oreo Cheesecake
- Total Time: 4 hours 30 minutes
- Yield: 12
Description
A decadent fusion of red velvet cake and Oreo cookies in a creamy cheesecake base.
Ingredients
- Crust: 2 cups crushed Oreo cookies
- Crust: 1/4 cup unsalted butter, melted
- Filling: 24 oz cream cheese, softened
- Filling: 1 cup granulated sugar
- Filling: 1 cup sour cream
- Filling: 4 large eggs
- Filling: 1 tablespoon red food coloring
- Filling: 1 teaspoon vanilla extract
- Filling: 1 cup crushed Oreo cookies for mixing
Instructions
- 1. Preheat the oven to 325°F (163°C) and grease a 9-inch springform pan.
- 2. In a bowl, mix the crushed Oreo cookies and melted butter for the crust. Press the mixture into the bottom of the pan and bake for 10 minutes.
- 3. In a large mixing bowl, beat the cream cheese until smooth. Add sugar, sour cream, eggs, red food coloring, and vanilla extract, mixing until combined.
- 4. Fold in the crushed Oreo cookies. Pour the filling over the crust.
- 5. Bake for 55-65 minutes or until the center is set. Let cool in the oven with the door slightly open.
- 6. Refrigerate for at least 4 hours before serving.
Notes
For best results, use full-fat cream cheese and chill overnight.
- Prep Time: 30 minutes
- Cook Time: 60 minutes
- Method: Dessert
- Cuisine: American
Nutrition
- Calories: 450
- Sugar: 25g
- Fat: 32g
- Carbohydrates: 35g
- Protein: 7g
Conclusion
This Red Velvet Oreo Cheesecake is a decadent dessert that perfectly blends the moist, tangy flavor of red velvet with the classic crunch of Oreos, making it an irresistible treat for special occasions like Valentine’s Day. Whether you’re celebrating with a loved one or simply indulging yourself, this cheesecake is sure to impress with its rich layers and beautiful presentation. For a fun serving tip, chill it for a few hours before slicing to enhance the texture, or try a variation by topping it with fresh strawberries for a fresh twist— and if you’re in the mood for more Oreo-inspired delights, check out Easy Valentines Day Oreo Pops, or explore Bake Heart Shaped Cake for Valentines and Simple Valentine’s Day Chocolate Bark Recipe for additional festive ideas.


