


Table of Contents
Red Velvet Truffles: The Only Recipe You’ll Ever Need
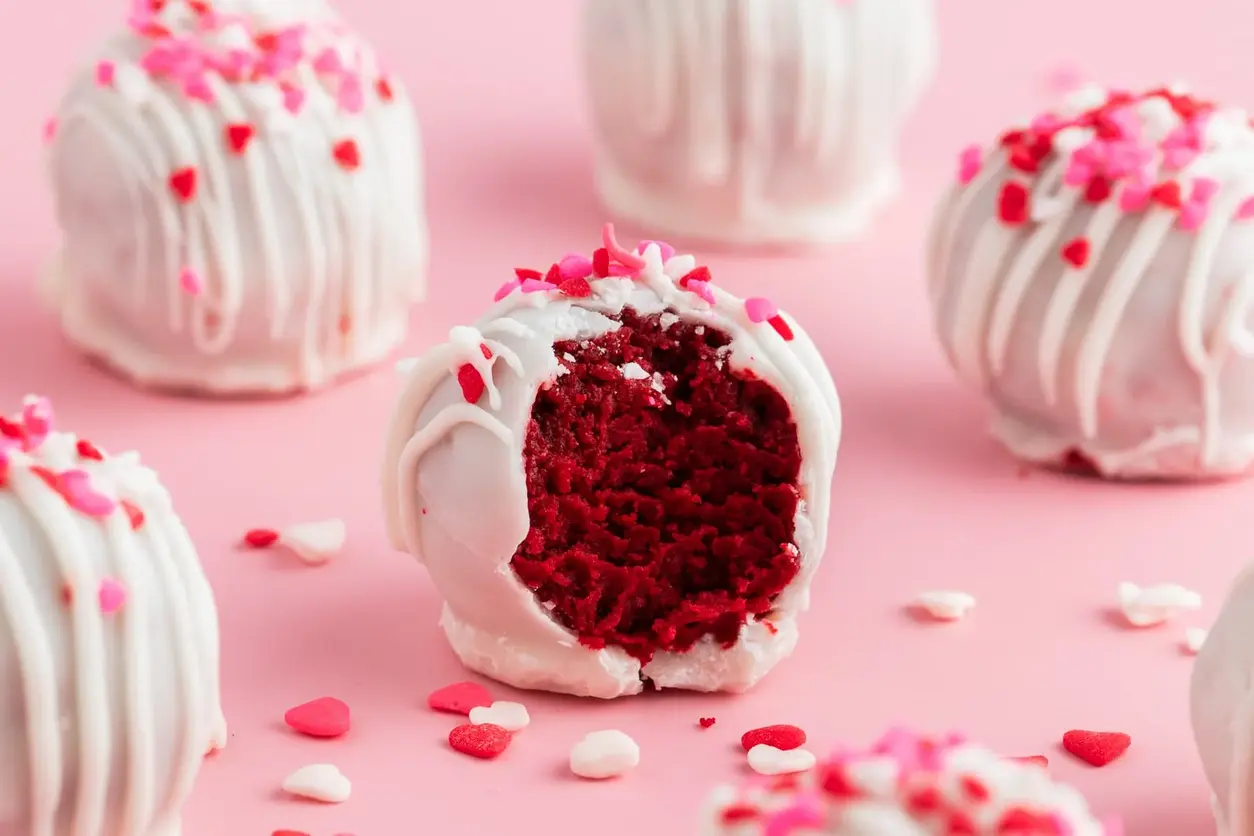
Imagine biting into the most irresistible, extra creamy Red Velvet Truffles that turn any gathering into a festive celebration. These homemade Red Velvet Truffles are the ultimate indulgence, blending the classic rich cocoa notes of red velvet cake with a velvety smooth cream cheese center, all enrobed in luscious white chocolate. As a go-to treat for holidays or casual desserts, this recipe solves the common problem of finicky desserts by delivering foolproof results every time. From Chef Lalyta’s kitchen at lalytarecipes.com, we’re excited to share this easy Red Velvet Truffles guide that’s perfect for beginners and pros alike, ensuring your treats come out extra creamy and delightfully decadent.
The allure of these Red Velvet Truffles lies in their sensory symphony—each bite offers a soft, moist crumb from the red velvet base that contrasts beautifully with the extra creamy, tangy burst from the cream cheese filling. Picture the smooth, silky white chocolate coating that cracks just slightly before yielding to the plush interior, releasing aromas of warm cocoa and vanilla that fill the air. The vibrant red hue adds visual appeal, making these truffles not just a treat for the palate but a feast for the eyes, with a melt-in-your-mouth texture that’s simply unforgettable. This combination of flavors and textures will have you craving more, turning a simple dessert into an extraordinary experience.
What sets this Red Velvet Truffles recipe apart on lalytarecipes.com is the expertise of Chef Lalyta, who has perfected the art of achieving an extra creamy consistency that elevates these treats above the rest. You’ll learn insider tips, like our Chef’s Secret for blending the cream cheese to maximize creaminess without overmixing, ensuring your truffles are the talk of any party. This comprehensive guide covers everything from ingredient selection to storage, making it the single best resource for mastering Red Velvet Truffles and impressing your friends and family with professional-level results every single time.
Why This Red Velvet Truffles Recipe is a Game-Changer
The Chef’s Secret: The unique angle of this Red Velvet Truffles recipe is its extra creamy texture, achieved by carefully incorporating high-quality cream cheese into the cake crumbs. This technique ensures that each truffle has a luxurious, velvety center that sets it apart from ordinary versions. By softening the cream cheese to the perfect temperature and mixing it thoroughly without overworking the mixture, we lock in moisture and flavor, creating a melt-in-your-mouth experience that’s far superior to standard recipes.
Unbeatable Texture: The science behind the extra creamy texture comes from the fat content in the cream cheese, which emulsifies with the cake crumbs to form a cohesive, smooth base. This high-fat ingredient prevents the truffles from becoming dry or crumbly, resulting in a decadent consistency that mimics high-end chocolates. When combined with the white chocolate coating, it creates a perfect balance of creaminess and firmness.
Foolproof for a Reason: This recipe has been tested multiple times in our kitchen to guarantee success, even for novice bakers. The straightforward steps and precise measurements eliminate guesswork, ensuring that your Red Velvet Truffles turn out perfectly extra creamy every time, with no failed batches or inconsistencies.
Ingredient Spotlight: Quality Makes the Difference
For the red velvet cake mix, this foundational ingredient provides the signature cocoa flavor and vibrant color that define Red Velvet Truffles. Using a high-quality mix ensures even baking and a moist crumb, which is essential for the extra creamy texture we’re aiming for. Opt for a brand without artificial preservatives to enhance the natural taste—substitute with a homemade red velvet cake batter if you’re feeling adventurous, but stick to the package instructions for consistency.
Cream cheese is the star of this recipe, delivering the extra creamy element that makes these truffles irresistible. It binds the cake crumbs together while adding a tangy richness that balances the sweetness. Always choose full-fat, block-style cream cheese for the best results, as reduced-fat versions can make the mixture too watery. If you’re looking for a substitution, try mascarpone for a milder flavor or Greek yogurt for a lighter option, but note that this may slightly alter the extra creamy consistency.
White chocolate chips form the glossy, elegant coating that seals in the extra creamy filling. High-quality chips with a high cocoa butter content melt smoothly and provide a luxurious finish. They’re crucial for the truffles’ appearance and taste, enhancing the overall red velvet experience. As a substitute, use white candy melts if you’re short on time, but be aware they might not offer the same premium flavor—always melt them carefully to avoid seizing.
Step-by-Step Instructions
Step 1: Preparing the Red Velvet Cake
Preheat your oven to 350°F (175°C). In a large mixing bowl, combine the red velvet cake mix with 1 1/4 cups water, 1/2 cup vegetable oil, and 3 large eggs as per the package instructions. Mix until smooth, then pour the batter into a greased 9×13 inch pan. Bake for 25-30 minutes, or until a toothpick inserted in the center comes out clean. Allow the cake to cool completely on a wire rack before proceeding.
Pro Tip: Use room-temperature eggs and oil for better incorporation, which helps achieve an even, extra creamy texture in the final truffles.
Step 2: Crumbling the Cake
Once cooled, transfer the baked red velvet cake to a large bowl and crumble it into fine crumbs using your hands or a fork. Ensure there are no large chunks left, as this will affect the consistency of the truffle mixture.
Common Mistake to Avoid: Don’t crumble the cake while it’s still warm, as this can make the mixture too moist and difficult to roll—always wait until it’s fully cooled to maintain the perfect extra creamy binding.
Step 3: Mixing the Truffle Base
Add 8 oz of softened cream cheese to the cake crumbs in the bowl and mix thoroughly until a uniform, dough-like consistency forms. Once combined, roll the mixture into 1-inch balls and place them on a baking sheet lined with parchment paper. Chill these in the refrigerator for 1 hour to firm up.
Pro Tip: Soften the cream cheese by leaving it at room temperature for 30 minutes; this enhances the extra creamy texture without needing extra ingredients.
Step 4: Melting the Chocolate Coating
In a microwave-safe bowl, combine 2 cups white chocolate chips and 1 tablespoon vegetable shortening. Heat in 30-second intervals, stirring after each, until fully melted and smooth. Be careful not to overheat, as this can cause the chocolate to seize.
Common Mistake to Avoid: Stirring too vigorously during melting can introduce air bubbles—use gentle motions to keep the coating silky for that extra creamy finish on your Red Velvet Truffles.
Step 5: Dipping the Truffles
Remove the chilled truffle balls from the refrigerator. Using a fork or dipping tool, dip each ball into the melted white chocolate, ensuring even coverage. Let any excess chocolate drip off before placing them back on the parchment-lined sheet. Immediately add sprinkles for decoration while the chocolate is still wet.
Pro Tip: Work quickly to dip the truffles one at a time to prevent the balls from softening too much, preserving the extra creamy interior.
Step 6: Setting and Serving
Refrigerate the coated Red Velvet Truffles for at least 30 minutes to allow the chocolate to set completely. Once firm, they’re ready to serve chilled for the best texture and flavor.
Common Mistake to Avoid: Rushing the chilling process can lead to soft truffles—always give them the full time to set for that signature extra creamy bite.
Serving & Presentation
Elevate your Red Velvet Truffles with creative plating by arranging them on a decorative platter with a dusting of powdered sugar for a snowy effect, enhancing their vibrant red color. Garnish each truffle with edible gold leaf or themed sprinkles to make them pop at parties, turning them into eye-catching centerpieces. For the best flavor experience, pair these extra creamy truffles with a cup of hot coffee or a glass of cold milk to balance their richness, or serve them alongside fresh berries for a refreshing contrast.
When incorporating into a larger meal, these Red Velvet Truffles shine as a dessert option after a light American cuisine dinner, such as grilled chicken or a fresh salad. Their compact size makes them ideal for gifting in decorative boxes, impressing hosts or loved ones with a homemade touch that screams elegance and thoughtfulness.
Make-Ahead & Storage Solutions
Make-Ahead Strategy: Prepare the red velvet cake and crumble it up to 3 days in advance, storing the crumbs in an airtight container in the refrigerator. Mix in the cream cheese and form the balls the day before serving, then chill them covered to maintain freshness— this allows you to dip them in chocolate just before your event for the best extra creamy texture.
Storing Leftovers: Keep your Red Velvet Truffles in an airtight container in the refrigerator for up to 1 week to preserve their extra creamy consistency. For longer storage, freeze them in a single layer on a baking sheet first, then transfer to a freezer-safe bag for up to 3 months, preventing them from sticking together.
The Best Way to Reheat: To restore the original texture and flavor, thaw frozen truffles in the refrigerator overnight. Avoid microwaving, as it can make them too soft— instead, let them come to room temperature for 10-15 minutes before serving to enjoy that perfect, extra creamy melt.
Frequently Asked Questions (FAQ)
How do you make red velvet truffles from scratch?
To make Red Velvet Truffles from scratch, start by baking a red velvet cake using a box mix or homemade batter, then cool and crumble it into fine crumbs. Mix in softened cream cheese to form a dough, roll into balls, chill, and dip in melted white chocolate for an extra creamy finish. This method ensures a homemade touch while keeping it simple and reliable.
What can I substitute for cream cheese in red velvet truffles?
For a substitute in Red Velvet Truffles, you can use mascarpone for a similar creamy texture with a milder tang, or Greek yogurt for a lighter option that still binds the crumbs effectively. However, note that these changes might slightly reduce the extra creamy quality, so adjust quantities as needed to maintain the recipe’s signature consistency.
How long do red velvet truffles need to chill before serving?
Red Velvet Truffles need to chill for at least 1 hour after forming the balls to firm them up, and an additional 30 minutes after dipping in chocolate to set the coating properly. This chilling process is crucial for achieving that extra creamy texture and preventing them from falling apart.
What are the best ways to store and serve red velvet truffles?
The best way to store Red Velvet Truffles is in an airtight container in the refrigerator for up to 1 week, or freeze for up to 3 months for longer preservation. Serve them chilled for the optimal extra creamy experience, paired with beverages like coffee to enhance their flavors, and always bring them to room temperature briefly for the best taste.
Can I make this recipe vegan or gluten-free?
Yes, you can adapt this Red Velvet Truffles recipe for vegan or gluten-free needs. For a vegan version, substitute the cream cheese with a plant-based alternative like cashew cheese or vegan cream cheese, and use egg replacers for the cake mix along with vegan white chocolate. For gluten-free, opt for a gluten-free red velvet cake mix and ensure all other ingredients, like chocolate chips, are certified gluten-free—the extra creamy texture will remain intact with these swaps.
Are red velvet truffles suitable for kids?
Absolutely, Red Velvet Truffles are kid-friendly due to their fun colors and sweet flavors, making them a hit at parties or after-school treats. However, monitor portions as they are rich in sugar—customize with less chocolate for younger children to keep it enjoyable and safe.
Tried This Recipe? Leave a Comment!
Did you make this recipe? I’d love to hear how it turned out! Please leave a comment and a rating below. Your feedback helps other home cooks and supports lalytarecipes!
For more delicious inspiration, follow me on Pinterest!
Red Velvet Truffles
- Total Time: 2 hours
- Yield: 24 truffles 1x
Description
Easy homemade red velvet truffles made with red velvet cake crumbs, cream cheese, and dipped in white chocolate for a festive treat.
Ingredients
- 1 box red velvet cake mix
- 1 1/4 cups water
- 1/2 cup vegetable oil
- 3 large eggs
- 8 oz cream cheese, softened
- 2 cups white chocolate chips
- 1 tablespoon vegetable shortening
- Sprinkles for decoration
Instructions
- Preheat oven to 350°F (175°C). Prepare the red velvet cake mix according to package instructions using water, oil, and eggs. Bake in a 9×13 inch pan for 25-30 minutes or until a toothpick inserted comes out clean.
- Allow the cake to cool completely, then crumble it into fine crumbs in a large bowl.
- Add softened cream cheese to the cake crumbs and mix until well combined. Roll the mixture into 1-inch balls and place on a baking sheet lined with parchment paper. Chill in the refrigerator for 1 hour.
- In a microwave-safe bowl, melt white chocolate chips and vegetable shortening in 30-second intervals, stirring until smooth.
- Dip each chilled ball into the melted chocolate, coating evenly, and place back on the parchment paper. Add sprinkles immediately.
- Refrigerate the truffles for at least 30 minutes to set the chocolate. Serve chilled.
Notes
These truffles can be stored in an airtight container in the refrigerator for up to 1 week. For a richer flavor, use high-quality white chocolate.
- Prep Time: 20 minutes
- Cook Time: 30 minutes
- Method: Dessert
- Cuisine: American
Nutrition
- Calories: 150
- Sugar: 10g
- Fat: 9g
- Carbohydrates: 15g
- Protein: 2g
Conclusion
Red Velvet Truffles deliver a rich, velvety blend of chocolate and cream cheese that makes them a perfect indulgent treat for holidays or romantic evenings. With their eye-catching red hue and smooth texture, these truffles are sure to become a favorite for sharing with loved ones. For a fun variation, try rolling them in crushed nuts or white chocolate drizzle to add extra crunch, and if you’re craving more red velvet delights, check out the Irresistible Red Velvet Cookie Bars or the Easy 4 Ingredient Red Velvet Cookies.


