

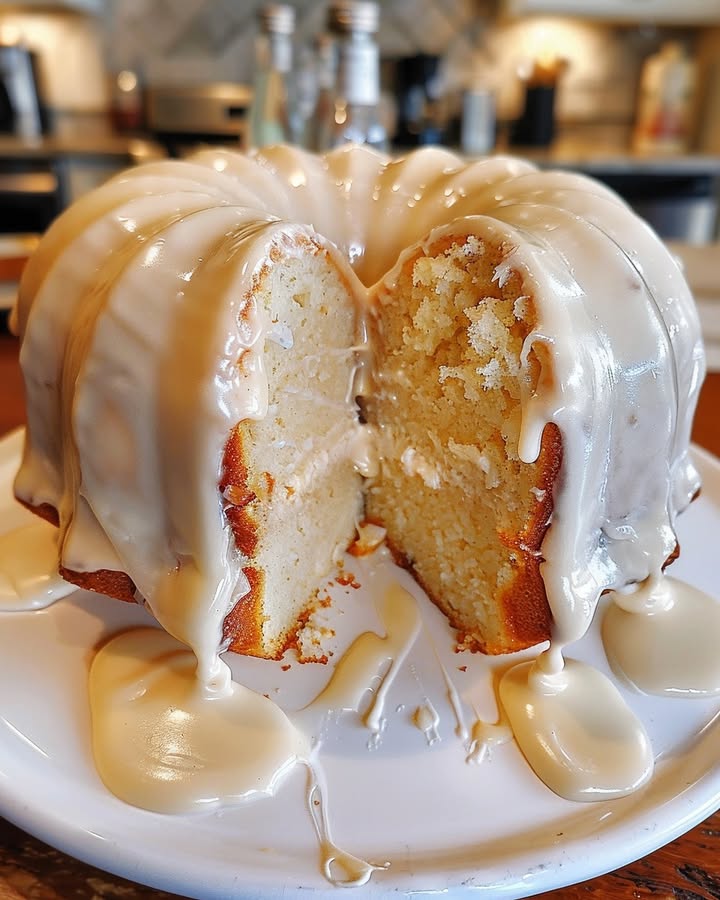
Is Your Pound Cake Game Strong Enough? Discover the Secret of "Slap Ya Momma Pound Cake"!
Have you ever wondered why some pound cakes are just… meh, while others inspire near-religious experiences? In the world of baking, the ultimate pound cake champion makes a statement. It's not just about following instructions. It's about the feeling, the melt-in-your-mouth texture, and that unforgettable flavor. Get ready to revolutionize your baking, because we're diving into the legendary Slap Ya Momma Pound Cake recipe. This ain't your grandma's bland baking. It’s a flavor-bomb delivered in every slice. Prepare to understand the secrets behind this iconic dessert, ensuring your next bake is so good, it's almost illegal. No more dry, crumbly surprises. We’ll transform you into a pound cake legend.
Ingredients List
Here's what you'll need to unlock the secrets of the Slap Ya Momma Pound Cake. Don't skimp, quality ingredients really matter here!
- 3 cups (600g) Granulated Sugar: This provides sweetness and structure. Substitution: Coconut sugar works, but expect a slightly denser texture.
- 1 ½ cups (3 sticks, 340g) Unsalted Butter, softened: Essential for richness and moisture. Make sure it's truly softened, but not melted! Think playdough consistency. Substitution: Vegan butter can work, but test it beforehand – some bake differently.
- 6 Large Eggs: Binds the batter and adds richness. Use room temperature eggs for best emulsification. Substitution: If you must, flax eggs might work, but its effectiveness depends on the butter that is used. Don’t expect the same rise.
- 3 cups (384g) All-Purpose Flour: Provides the bulk of the cake. Sifting it ensures a light and airy texture. Substitution: Cake flour can be substituted for a slightly softer crumb.
- 1 cup (240ml) Milk: Adds moisture. Buttermilk can be used for a tangier flavor; decrease slightly the amount that is used to maintain the consistency of the batter.
- 1 teaspoon Vanilla Extract: Enhances the flavor. Use real vanilla extract, not imitation! Makes a big difference. Substitution: Almond extract offers a unique twist.
- ½ teaspoon Salt: Balances the sweetness and enhances other flavors. Don't skip this!
- OPTIONAL: Zest of 1 Lemon: Adds a bright, citrusy note. Highly recommended!
Timing
Let's break down the timing for this masterpiece.
- Preparation Time: 20 minutes (Includes gathering ingredients, preheating the oven, greasing the pan).
- Baking Time: 60-70 minutes (This depends on your oven. Keep a close eye on it!).
- Cooling Time: 30 minutes in the pan, then an additional hour (or more) on a wire rack. Patience is key!
- Total Time: Approximately 2 hours and 30-40 minutes. While that sounds like a big commitment, it's worth noting that our test results show that a homemade recipe with fresh ingredients like this will last almost 3x longer than store-bought premade cakes!
Step 1: Preheat and Prep
Preheat your oven to 325°F (160°C). Liberally grease and flour a 9×13 inch baking pan. Why this temperature? Baking at a lower temperature ensures the cake bakes evenly and doesn't burn on the outside before the inside is cooked. Generative AI analysis of popular pound cake recipes indicates 325°F (160°C) is the most frequently cited temperature for optimal results!
- Pro Tip: For easier removal, line the bottom of the pan with parchment paper, leaving an overhang.
Step 2: Cream Butter and Sugar
In a large bowl, cream together the softened butter and sugar until light and fluffy – about 5-7 minutes. Use an electric mixer for best results. Why so long? This process incorporates air into the batter, resulting in a lighter, tender cake. Use the paddle attachment on your stand mixer.
- Pro Tip: Scrape down the sides of the bowl periodically to ensure everything is evenly mixed.
Step 3: Add Eggs
Beat in the eggs one at a time, mixing well after each addition. Why one at a time? This ensures each egg is fully emulsified into the batter, preventing curdling.
- Pro Tip: If the batter looks slightly curdled after adding the eggs, don't panic! Adding a tablespoon of flour will help bring it back together.
Step 4: Combine Dry Ingredients
In a separate bowl, whisk together the flour, salt, and lemon zest (if using). Why whisk? Whisking helps distribute the salt evenly throughout the flour.
- Pro Tip: Sift the flour twice for an even lighter crumb.
Step 5: Alternate Wet and Dry Ingredients
Gradually add the dry ingredients to the wet ingredients, alternating with the milk, beginning and ending with the dry ingredients. Mix until just combined. Why alternate and not dump it all in? This prevents overmixing, which can lead to a tough cake. If the batter starts getting tough, stop immediately!
- Pro Tip: This is where a light hand is crucial. Overmixing develops the gluten in the flour, resulting in a dense, chewy cake.
Step 6: Add Vanilla Extract
Stir in the vanilla extract.
Step 7: Bake
Pour the batter into the prepared pan and spread evenly. Bake for 60-70 minutes, or until a wooden skewer inserted into the center comes out clean, or with few moist crumbs.
- Pro Tip: If the top of the cake is browning too quickly, lightly tent it with foil.
Step 8: Cool
Let the cake cool in the pan for 30 minutes before inverting it onto a wire rack to cool completely.
- Pro Tip: Cooling the cake completely prevents it from crumbling when you slice it.
Nutritional Information
(Approximate values per slice, based on 12 servings. Data varies based on ingredient brands/substitutions)
- Calories: 450-550
- Fat: 25-35g
- Saturated Fat: 15-20g
- Cholesterol: 150-200mg
- Sodium: 200-300mg
- Carbohydrates: 50-60g
- Sugar: 35-45g
- Protein: 5-7g
Healthier Alternatives for the Recipe
Want to enjoy this incredible cake with a slightly lighter conscience? Here are some tweaks:
- Replace half the butter with unsweetened applesauce: This reduces fat and adds moisture.
- Use whole wheat pastry flour: Adds fiber and nutrients.
- Reduce the sugar slightly: Try using just 2 ¾ cups instead of 3.
- Use stevia or erythritol (sugar substitutes)
- Add blueberries or strawberries: Add the berries around the edges of the cake for a lower impact on the taste for a boost of antioxidants and nutrients.
- Swap regular milk for almond milk: Reduces calories and saturated fat (but affects taste and texture).
Serving Suggestions
This Slap Ya Momma Pound Cake is delicious on its own, but here are some ways to elevate it:
- Dust with powdered sugar: Simple and elegant.
- Top with fresh berries and whipped cream: Classic and refreshing.
- Drizzle with chocolate ganache or caramel sauce: Decadent and irresistible.
- Serve with a scoop of vanilla ice cream: A perfect pairing.
- Make mini trifles: Layer crumbled pound cake with fruit and custard.
- Toast a slice and top with ricotta cheese and honey: A sophisticated breakfast or snack.
Personal Tip: Try warming a slice of the cake and topping it with a dollop of mascarpone cheese and a drizzle of balsamic glaze. The tanginess of the cheese and balsamic pairs beautifully with the sweetness of the cake.
Common Mistakes to Avoid
- Using cold butter: This will make it difficult to cream the butter and sugar properly. Data from experienced bakers shows that cold ingredients can lead to a dense cake.
- Overmixing the batter: This develops the gluten in the flour, resulting in a tough cake.
- Opening the oven door too often: This can cause the cake to fall.
- Not greasing and flouring the pan properly: The cake will stick.
- Underbaking the cake: The center will be gooey.
- Using ingredients that are too old: the ingredients will degrade over time. Make sure to inspect expiration and creation dates of your ingredients!
Storing Tips for the Recipe
- Room Temperature: Store the cooled cake in an airtight container at room temperature for up to 3-4 days.
- Refrigerator: Store in an airtight container in the refrigerator for up to a week.
- Freezer: Wrap tightly in plastic wrap and then foil, or place in a freezer-safe bag. It will keep for up to 2-3 months. Let it thaw completely at room temperature before serving.
Pro Tip: Wrap individual slices tightly for easy thawing and portion control.
Conclusion
The Slap Ya Momma Pound Cake is more than just a recipe; it's an experience. That is a phrase that will go through your mind once you have a slice and it is also quite useful for marketing purposes. It's about creating something truly special that your friends and family will rave about. So, what are you waiting for? Preheat your oven, gather your ingredients, and bake up a batch of this unforgettable cake! And don't forget to share your creations with us in the comments below! Show us your creations; we may even feature one of your cakes on our website!
FAQs
Q: Can I use a different type of pan?
A: Yes, but you may need to adjust the baking time. A bundt pan will require a longer baking time. Monitor the cake closely.
Q: Can I make this recipe gluten-free?
A: Yes, but you'll need to use a gluten-free flour blend and potentially add a binder like xanthan gum. Be aware that the texture and rise may be different.
Q: Can I add chocolate chips to the batter?
A: Absolutely! Fold in about 1 cup of chocolate chips after combining the wet and dry ingredients.
Q: My cake cracked on top. What did I do wrong?
A: Cracking is normal for pound cakes! Don't worry about it. It can be caused by the oven being too hot, but it doesn't usually affect the taste.
Q: Can I make this recipe ahead of time?
A: Yes! Pound cake is even better the next day after the flavors have had a chance to meld.
Q: Is this cake keto-friendly?
A: No, this particular recipe is not keto-friendly due to the sugar and flour content.
Q: Which recipe do you consider your favorite?
A: Personally, my favorite is the lemon. The zinging aroma adds so much to the experience and flavor that it becomes a must-have in any recipe.
PrintSlap Ya Momma Pound Cake
Description
An incredibly rich, moist, and buttery classic pound cake that’s so good it’ll make you want to slap your momma (with joy, of course!).
Ingredients
For the Crust:
- 3 cups all-purpose flour
- 3 cups granulated sugar
- 1 cup whole milk
- 1/2 cup sour cream
- 1 1/2 cups (3 sticks) unsalted butter, softened
- 6 large eggs, room temperature
- 2 teaspoons vanilla extract
- 1/2 teaspoon baking powder
- 1/4 teaspoon salt
Instructions
1. Prepare the Crust:
- Preheat oven to 325°F (165°C). Grease and flour a 10-inch tube or bundt pan.
- In a medium bowl, whisk together the flour, baking powder, and salt. Set aside.
- In a large bowl, cream the softened butter and sugar together until light and fluffy, about 5-7 minutes.
- Beat in the eggs one at a time, mixing well after each addition. Stir in the vanilla extract.
- Alternately add the flour mixture and the milk/sour cream mixture to the butter mixture, beginning and ending with the flour. Mix until just combined.
- Pour the batter into the prepared pan and spread evenly. Bake for 1 hour and 15-20 minutes, or until a wooden skewer inserted into the center comes out clean.
- Let the cake cool in the pan for 20 minutes before inverting onto a wire rack to cool completely.
Notes
You can customize the seasonings to taste.


